Food is so amazing; it is so often the focus of our lives - whether it's a celebration or a simple meal, food can bring together friends and families while nourishing the body and soul. I love food and I love to eat so it occurred to me that I could share this love with you. Bon Appetit!
Search This Blog
Sunday, November 25, 2018
Long Lost Cook
In the past two years we have grown children into young adults and managed all of their activities, as so many others do...however, we also moved house. This alone is not a novelty but it’s been a large undertaking for us with three kids, a dog, two full time working adults, three new schools for kids, and all the things that go along with any of the above. Food has been important, as it always is for us, but I haven’t focused too much on photographing or writing about what I’ve cooked or baked. And if you add in the ease of snapping pics onto Instagram or Facebook then you can imagine just how undisciplined one can be with regard to her own blog. Now, take into consideration that the technology has changed since the creation of this blog and I know that it’s quite easy to craft a blogpost nowadays...however, I just tried to update my blog platform and low and behold the technology has seriously changed so much that it’s now a complete relic! That’s an issue for another day...
So why am I here now? Well, an old childhood friend of mine posted a lovely comment to my Facebook feed yesterday about the blog and how much he enjoyed it and it made me long to be creative again. Apparently someone is interested in what I’m cooking!
Here’s tonight’s dinner:
Apple-Sausage Stuffed Pork Chops
Stuffing:
3 tablespoons, butter + 1 tablespoon
Oion, chopped
2 celery stalks, chopped
1/4 cup finely chopped parsley
1 link chicken and apple sausage, finely diced
5 cups potato bread cubes plain stuffing
4 oz. chicken broth
1 tsp ground ginger
1 tsp ground nutmeg
1 Apple, peeled and flesh chopped into small dice
1/3 cup dried cranberries
Salt and pepper
5 extra thick pork chops
15 medium wooden toothpicks
2 tablespoons olive oil
1 heaping tablespoon, flour
1 tablespoon butter
2 tablespoons Dijon Mustard
2/3 cup chicken broth
1 tablespoon Calvados or other brandy
Preheat oven to 350.
Prepare stuffing by first melting butter in a large sauté pan over medium heat. Next add it in the sausage and sauté until beginning to crisp. Next add in the celery and the onion along with the ginger and nutmeg. Sauté until onions and celery are soft. Next add in the bread crumbs and mix well and then add in several grindings of salt and pepper and finally add in the broth, along with the apple and the cranberries. Allow the broth of boil a moment before adding in the remaining tablespoon of butter and remove from heat.
Place each chop on a plate flat side down and with a sharp knife carefully slice the meat into what looks like a “pocket” into the thick side of the chop. Do not slice entire chop in half - instead, allow a piece of meat to remain on both the top and bottom ends of the chop. See photo. Salt both sides of the chops.
Using a quarter-cup measure, spoon a heaping 1/4 cup of the stuffing into the pocket of each chop and secure the flesh closed using three toothpicks.
Heat oil in large cast iron skillet or other heavy pan. Place eat chop into the pan and brown meat over medium high heat. Do not turn chops for at least 5-6 minutes to ensure a crispy outside. Cook chops about 5 minutes per side. Remove chops to a large baking dish and in the frying pan, mix flour and butter together until it forms a paste. Next add in the mustard and mix well - but quickly add in the brandy and let it boil up about 30 seconds while scraping up all the browned meat bits. Next add in the chicken broth and boil for 45 seconds. Pour the liquid over the chops and bake uncovered for 30-35 minutes or until meat thermometer registers proper temperature.
Serve!!
Sunday, October 16, 2016
Left Over Hit
With a busy school and work week ahead, I decided to make a spiral ham for dinner this weekend with mashed potatoes and vegetables. I love them - super easy to bake and serve and even easy to clean up.
The ham provided us with a lot of left overs - for lunches for the week, for breakfast omelettes and for tonight's dinner of butternut squash risotto. The kids each had about four helpings - a good barometer by anyone's standards. On a cool night like tonight, this stick-to-your-ribs dinner was perfect and really easy to make!
Butternut Squash Risotto with Honey Ham and Peas
4 oz cooked honey baked ham, cubed
1 medium onion, finely chopped
6 tablespoons, unsalted butter + 2 tablespoons
Fresh sage leaves, 3, torn into small pieces
1 1/2 cup arborio rice
2 cups fresh cubed butternut squash
16 oz chicken stock
12 oz chicken broth
1 cup petit frozen peas, thawed in hot water
2/3 cup grated Parmesan
Salt
In a medium saucepan, place the squash in a small strainer over 2 cups of water. Do not allow the strainer to touch the water. Cover the top tightly with foil and steam on high heat for about 15 - 20 minutes, until squash is soft enough to pierce easily with a fork. Set pot aside - covered.
In a medium pot, warm over low heat the stock and broth, along with 1 1/2 cup of the cooking liquid from the squash.
In a large, heavy, shallow pot, melt the 6 tablespoons of butter over medium-high heat, until soft and foamy. Add the ham and sauté until it starts to brown. Add in the onion and sauté until translucent. Add in the rice and sauté until rice is coated with the ingredients, about 1 minute. Add in two cups of warmed liquid and stir until all liquid is absorbed and the mixture starts to feel dry, about 10 minutes. Continue to add in more liquid as the rice starts to soak up each cup of liquid. Stir well so the rice doesn't stick to the bottom of the pan! Salt the mixture, lightly.
Next add in the squash and mash well, add in the sage leaves and stir. Add in the peas and the last remainder of liquid and stir well. The entire process should take about 35 minutes.
Turn off the heat and add in the remainder of the butter and the cheese.
Tuesday, October 4, 2016
Back At It
So this happened...I finally got the inspiration back to write about the food I've been preparing for my family. Don't ask what's taken so long - I truly haven't a clue. I suppose it's the three kids, work and the household chores that have weighed me down and made me lose my interest in writing. But recently I have been itching to get back to it and this weekend was filled with cooking - for the Jewish Holiday of Rosh Hashanah - and with the last two days off from work, I had a little time and decided to leap back into the process.
Inspired by the beautiful food we grew this summer, along with the most incredible trip we took - to Sicily - I longed for Pasta alla Norma - a pasta dish we ate several times near Catania. This dish is rich and velvety and has hidden gems inside the sauce. It's a favorite daughter of Sicily's east coast and is slightly varied throughout the area. So with an abundance of homegrown eggplant and basil staring at me, it was time to dive in and recreate this lovely dish!
While there are a few steps and ingredients for this dish, it is not an intimidating one. All of the ingredients are accessible and can be procured easily. I recommendation using the very best ingredients you can find (the best olive oil, the best salt, the freshest vegetables, etc). That seems to be the secret to excellent Italian cooking - simple and fresh.
My kids don't care for eggplant but they just pushed it aside. The sauce was silky and sweet and the flavors were so simple yet complex. I highly recommend this and if you want to create - or recreate - a Sicilian experience, this would be the dish to try!
Pasta Alla Norma
1lb. pasta - a large one, like a ziti shape, with ridges
2 medium/large eggplant, cut into small cubes (about 2 lbs).
6 tablespoons olive oil, divided
Salt
3 medium garlic, finely chopped
24 oz. tomato passata (sauce)
1 tsp. Red pepper flakes
1/4 cup fresh basil, finely chopped
1 tablespoon sugar
1/4 cup whole milk ricotta cheese
1/3 cup grated pecorino romano
4 oz. grated whole milk mozzarella
1/4 cup pignoli nuts
Place cut eggplant into a strainer in the sink and sprinkle with salt. Allow it to sit an hour. Rinse, gently, with cold water and drain well - and pat dry - with paper towels.
Preheat oven to 400. Prepare a baking tray with a piece of parchment paper and brush with 2-3 tablespoons of olive oil. Spread dried eggplant onto the sheet, roll it in the oil and roast for about 25 minutes.
In a large, heavy, sauté pan, heat remaining oil, about 1/2 tablespoon salt and red pepper flakes (about 1/2 teaspoon) over medium-high heat for about 1 - 2 minutes. Add in the garlic and sauté another minute. Pour in the sauce and pour water halfway into the bottle to dislodge the remaining sauce from the bottle and pour it into the pan. Bring the sauce to a boil and constantly stir.
Meanwhile, bring water to a boil for a full pound of pasta. Salt the water and cook the pasta according to directions.
After about 10 minutes, add in the sugar and half the basil into the sauce. Stir well and continue to cook over medium-high heat, sauce will thicken.
Drain pasta - but reserve about 1 cup of cooking liquid, in case sauce is too thick and you need a little liquid to thin it.
In a large serving dish, pour 3/4 of the sauce over the cooked pasta. Add in 3/4 of the eggplant, more basil, the grated Parmesan, and the ricotta. Mix well. Sprinkle with remaining basil, grated mozzarella, remaining eggplant and the pignoli nuts.
Mangia!!
Thursday, April 2, 2015
A Sweet Passover: Recipe
Apparently others use this kind of recipe throughout the year using saltine crackers - sounds like we all have it right. I used a gluten free matzo today which is so very crispy compared to matzo with gluten or egg. It couldn't have been better!
Warning: This is addicting - and with a touch of sea salt on top, it was heavenly!
Salted Caramel-Chocolate Matzo
4 sheets of matzo - not egg matzo
1 1/4 cup dark brown sugar, packed
12 oz. milk or dark chocolate chips
1/2 cup (1 stick) of unsalted butter
Coarse sea salt
Preheat oven to 250.
Line a heavy baking sheet with parchment paper and top with the 4 sheets of matzo.
Melt the butter in a saucepan and add sugar - mix well. Pour mixture on the matzo. Spred, gently, and bake about 20 minutes.
Remove from oven and sprinkle chips all over the hot sugar. Tent with foil about 30 minutes and spred with off-set spatula. Sprinkle with salt. Refrigerate about 2 hours. Break apart. Pieces can be stored in air tight container about 4 days.
Tuesday, January 27, 2015
Snow Food - Gone Bananas: Recipe
The eve of the January '15 "blizzard," found me in the kitchen. Not unlike millions of others who love to cook during cold winter storms, I decided to bake something with the three extremely ripe bananas I had in the house that no one would eat.
I doctored up a recipe I found by adding a layer of crumble and by pouring a cinnamon glaze on top that has now seeped into the cake -a few hours later - making it unbelievably moist and rich with flavor. I don't really like bananas all that much - I use them in my smoothies, mostly, and I eat them if I am hungry and stuck for something nutritious. However, I would eat this entire cake, if not for the fact that one piece is worth seven Weight Watcher points (as per the Weight Watchers Recipe Builder tool).
So...I'll go shovel snow for a while and eat a piece of cake when I come back in!
Banana Crumb Cake with Cinnamon Glaze
Serves 24
Cake
2 cups All-purpose flour
1 cup granulated sugar
1/2 cup (1 stick) unsalted butter
2 eggs
3 medium overripe bananas, mashed
1 cup sour cream
1 tsp. vanilla extract
1 tsp. ground cinnamon
2 tsp. baking soda
1/4 tsp. salt
Crumbs
1 cup all-purpose flour
1 cup granulated sugar
2 tablespoon ground cinnamon
1/3 cup plus 3 tablespoons unsalted butter, melted
Cinnamon Glaze
1 1/2 cup sifted confectioner's sugar
3 tablespoons whole milk
1 tsp ground cinnamon
Preheat oven to 350. Grease and flour 9x13 pan.
Mix together the 2 cups of flour, 1 cup of sugar, 2 tsp of baking soda, salt and cinnamon and set aside.
In a large bowl, cream sugar and butter together for about 5 minutes, until light and fluffy in color and texture. Next, add in the eggs, one at a time and before adding the next one, be sure to fully incorporate the egg into the mixture. Using a spatula, scrape down the sides and bottom of the bowl often to loosen the mixture that gets stuck.
Next, add in the vanilla and mashed banana. Mix gently. In alternating turns, mix in 1/2 of the flour mixture and the sour cream - ending with flour. Do not overbeat.
Pour 1/2 of the batter into the prepared pan.
In a medium bowl, mix together the dry ingredients for the crumbs. Pour in the melted butter and mix well using your hands to form crumbs. Sprinkle over the 1/2 mixture in the pan. Cover crumbs with remaining 1/2 batter and using an off-set spatula, gently spread batter to the edges.
Bake cake for about 35 minutes, until toothpick inserted comes out clean.
Allow cake to cool for about 45 minutes.
To make the glaze: put confectioner's sugar and cinnamon in a bowl and with a whisk mix in the milk, one tablespoon at a time. You may not need the last tablespoon - or or may not need the entire amount. Mix to your desired consistency and pour of the cake. Using a spatula, spread glaze over cake to the edges. Allow glaze to set about 1/2 hour...or not!
Tuesday, October 21, 2014
Take it to the Greek! Recipe
Meredith's Food For Life - Greek Lamb Burger with Green Sauce
The kids were apprehensive at first, one doesn't love burgers of any kind, but after the first two bites she didn't complain again and ate the whole burger, along with three helpings of rice and peas mixed with the green sauce I made.
The burgers were just right - not dry and not too juicy, either. They were seasoned with cumin, mint, and feta but it was the touch of cinnamon that took them over the top. The sauce was a purée of various greens, garlic and lemon and it was so good we all had thirds and mixed it with the rice.
It's nice when a glimmer of an idea comes to fruition and works perfectly. I ate my burger on toasted (and I mean toasted!) GF bread.
Greek Lamb Burgers with Green Sauce
Serves 5
1 lb. ground lamb
1/2 cup gluten free matzo meal
1 egg
1 tablespoon fresh chopped mint
1 small garlic clove, minced
1 1/2 tablespoon ground cumin
1 tablespoon ground coriander
1 tsp. ground cinnamon
2 tablespoons Kosher salt
1/4 cup crumbled feta cheese
Preheat oven to broil. Prepare broiler pan with aluminum foil. In a large bowl, mix all ingredients well. Form 5 meatballs and then flatten slightly - don't make them into flat patties. (I made two larger ones and three smaller ones) and broil about 7 minutes on the first side, flip and broil another 6 minutes. Let them sit for about 4 minutes before serving.
Green Sauce
In a food processor combine 1/2 cup fresh mint, 1/4 cup fresh arugula, 1/2 cup fresh parsley, and 1/2 cup fresh cilantro together with 1 large garlic clove, 6 black pitted kalamata olives in oil, juice of one lemon and 2 tablespoons olive oil. Process till smooth.
Monday, October 20, 2014
Side to Side: Recipe
Meredith's Food for Life: Roasted Beets with Goat Cheese and Aruglua
The creamy texture and slightly tangy flavor of goat cheese combines with the earthy flavor of the beets and always makes for a perfect combination.
The two older kids ate so much asapagus that there was barely any left for the rest of us! My husband said they tasted like asparagus chips - roasted and salted well, on both accounts.
Roasted Beets with Goat Cheese and Aruglua
1 bunch of beets; scrubbed clean and stems cut off
1/4 cup crumbled goat cheese
2-3 cups fresh baby arugula
1/2 cucumber, seeded and chopped
2 tablespoons olive oil
1 tablespoon balsamic vinegar
Preheat oven to 425. Wrap the beets individually in aluminum foil and place on a baking sheet. Bake about an hour. Let cool and peel off the outer layer of the beet. Slice thinly.
Arrange arugula on a serving platter and top with beets, cucumber and cheese. In a small bowl, mix together oil and vinegar and pour over the salad.
Crispy Roasted Asparagus
1 1/2 lb. thin asparagus, washed and trimmed (cut off the bottom 1/3 of the bunch)
1 tablespoon olive oil
1-2 tablespoon kosher salt
Preheat oven to 450. Place asapagus on a baking sheet and drizzle with oil and sprinkle with salt. Roast about 20 minutes.
Sunday, October 19, 2014
A Little Indian Delight: Recipe
Indian is one of my very favorite cuisines and for the most part, I find the food is prepared gluten free - they don't tend to thicken sauces with wheat, rye or barley or dredge protein in flour before sautéing. Naturally the breads are not gluten free but tonight we all enjoyed the side dishes, along with large helpings of basmati rice and imagined the Naan for another day.
I am always amazed at my kids when they enjoy the food "grown-ups" eat and tonight was no different. I could hear them chatting upstairs asking one another what I was making and I loved that they ran downstairs to eat when they were called. This dish is among my very favorites - I think most people love it - and there was nothing left when we were finished with dinner. I chose to use a lighter hand with the spices to be sure I could add more if I wanted to...you can't take away the kick once it's in there! Even the little one ate her dinner - now that makes a mom happy!
I rounded out this dish with basmati rice, steamed curry purple cauliflower and sautéed potatoes with peas. And for those who have never cooked an Indian dish before, I promise that you don't smell like curry afterwards - that's just not accurate.
Enjoy!!
Chicken Tikka Masala
6 garlic cloves, minced
1 tablespoon, fresh ginger, minced
1 tablespoon garam masala
1 tablespoon ground turmeric
1/2 tablespoon ground cardamom
1 tablespoon roasted ground coriander
1 1/2 tablespoon ground cumin
1 tsp. ground nutmeg
8 oz plain non-fat yogurt
28 oz can whole plum tomatoes
1 lb. boneless, skinless chicken thighs
1 onion, finely sliced
1/4 cup tomato paste
2 cups heavy cream
1 tablespoon vegetable oil
3/4 cup fresh cilantro, chopped + more for garnish
In a small bowl, combine all spices (garam masala and next 5) and set aside. Cut chicken into 2" square bites and place in a large bowl. In a medium bowl, whisk together yogurt, garlic, ginger and 2/3 of the spice mixture. (Reserve spice mixture for later use).
Pour the yogurt mixture over the chicken and coat all pieces. Cover and refrigerate about 4 hours.
Meanwhile, in a large heavy pot, heat the oil until very hot. Add the onions and sauté about 3-4 minutes or until they are soft and translucent. Next, add in the tomato paste and 1/2 of the reserved spice mixture. Mix well - until the paste becomes dark brown. Add in the whole tomatoes - crush them with your hands before putting into the pot. Add in the tomato juice from the can, as well. Bring mixture to a boil and stir. Add in the cream and cilantro and bring to a boil again. Lower the heat to medium and cook, uncovered, about 45-50 minutes so mixture thickens. If you wish to add in more spice, do so with about 20 minutes left of cooking, after you have tasted it.
Line a heavy broiler pan with foil and heat oven to broil. Cook the chicken for about 20 minutes - 10 minutes per side (be sure to turn chicken halfway through).
Let chicken cool slightly when finished and then place into the tomato mixture and allow the flavors to meld for about 5-8 minutes.
Sprinkle with fresh cilantro and serve over basmati rice.
Sunday, September 28, 2014
Chicken Cordon Bleu with a GF Twist: Recipe
Embarking on a two-week gluten elimination diet, the idea of making chicken cordon bleu came to mind. However, I was stuck for a while realizing that I like my chicken cordon bleu to have a crisp breaded crust and, naturally, the bread crumbs I had in the house were not gluten free.
What's a cook to do? Improvise!!
With the Jewish Holidays here, I happened to impulse-buy gluten free matzoh meal, thinking I might make matzoh ball soup for next week's meal before the fast. Today, I realized I could use it in place of breadcrumb. It was amazing and it did the trick! The kids and my husband were surprised that the chicken didn't taste any different than if I had made it using traditional breadcrumbs. And, truthfully, so was I.
I doctored the matzoh meal slightly to add more flavor: cheese, dried herbs and salt and pepper. This was a huge hit - even the near 3-yr old ate her entire plate of food. I served it with GF rice and steamed broccoli.
GF Chicken Cordon Bleu
Serves 5-6
1 lb. thinly sliced chicken breast
1/3 lb. Virginia Ham, sliced thin
1/2 lb. white American cheese, sliced thin
2 eggs
1 1/2 cups Gluten Free Matzoh Meal
1/3 cup grated Pecorino Romano cheese
1 tblspoon each: dried basil, parsley and oregano
2 tblspoon Kosher salt
Pepper
1 1/2 - 2 cups vegetable oil
Special equipment: 15-20 toothpicks
In a bowl, beat the two eggs and set aside.
In another bowl, mix together dried herbs, cheese, salt, pepper and matzoh meal.
On top of each slice of chicken breast, place two slices of ham and then two slices of cheese on top of the ham. The cheese and ham should cover the chicken from end to end. Roll each slice of chicken from one short side to the other - tightly - and afix with 3-4 toothpicks to secure.
Heat oil in a large heavy pot/pan - like a Dutch oven or large frying pan with high sides. Once the oil is sizzling hot, roll each piece of chicken in the egg and then in the matzoh meal and gently place in the oil. Do not turn for at least 4-5 minutes. If the oil and chicken look like they are beginning to burn, lower the heat slightly. Using silicone tongs, gently turn the chicken pieces until fully cooked - about 10-12 minutes in all.
Place chicken on a wire rack set over a paper towel inside a baking sheet, to catch any oil drippings. Let cool about 3-4 minutes and slice into 2" pieces.
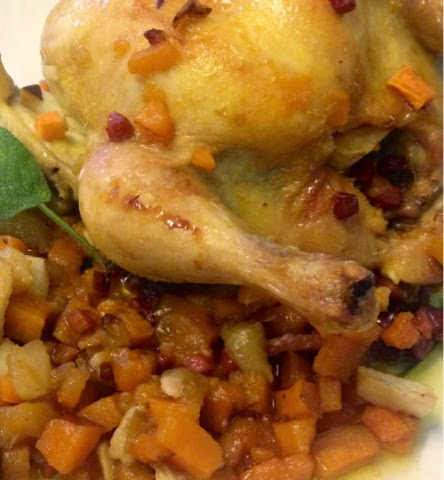
Sweet Fall Feast: Recipe
That said, this was terrific! It was inspired by a quick bite of a chef's 3pm trial of his own creation. Recently I was waiting for a late lunch at the take-out counter of a cool NYC restaurant and the chef wandered out with a new item he was trying: pan fried trout with roasted sweet potato, apple and sage. I looked longingly at the plate and he walked back into the kitchen to get me a fork. It was a fantastic - and served as the basis for this dish.
I like making Cornish Hens because they cook up fairly quickly and they're easy to eat. This smelled delicious and looked so festive - the addition of the honey made it a perfect meal to celebrate the New Year. L'Shanah Tovah!
Cornish Hens with Sweet Potatoes and Apples
Serves 4-6
4 Cornish Hens, rinsed clean and dried
3 med-large sweet potatoes, peeled and cut into 1" cubes
3 med-large apples, peeled and cut into 1" cubes
4 oz finely cubed Proscuitto
1 tablespoons olive oil
1 1/2 tablespoon honey
6-8 med fresh sage leaves
Salt/pepper
Preheat oven to 425. Bring medium saucepan to boil and add potatoes. Cook about 15 minutes and remove gently with slotted spoon. Reserve.
Meanwhile, drizzle 1 tablespoon of olive oil over the bottom on a large, heavy, oven proof pot (or roasting pan). Season hens with salt and pepper, liberally, and place in the middle of the pot. Sprinkle the Proscuitto around the hens and roast 15 minutes.
Lower the oven temperature to 350 and add the potatoes to the piles of Proscuitto and mix gently. Roast another 25 minutes. Then add apples and sage leaves to the sweet potato and Proscuitto and tuck one leaf into each hen. Drizzle honey on the hens and the vegetable/fruit medley and roast for another 35-40 minutes. Let hens rest outside the oven for about 10 minutes before carving and serving.
Sunday, August 31, 2014
Left-Over Pizza: Food Musings
Getting ready to start the week with new groceries made me clean out the fridge, naturally. I had some left over steak from two nights ago, pork from three or four days ago and ribs from last night. There was about a half a cup of left over broccoli and tons of fresh tomatoes. So what's a mom to do to feed everyone? I made a sauce by frying the left over meat, not including the ribs.
I used the sauce to make a pizza for the kids - and topped it with broccoli florets.
For the "adult" pizza, arugula served as the base and added a concentric circle of fresh tomato on top. Then I sprinkled the mozzarella cheese on top and topped it off with the left over rib meat that I shredded. I baked both pizzas according to the directions on the package and served the remaining sauce with a bowl of rotini! Excellent dinner - and a really easy way to use up with's in the fridge.
Tuesday, August 26, 2014
Sweet and Savory: Watermelon and Feta Salad
I had all the ingredients for this - all, really there were only three - and put them together in a pretty bowl. My oldest daughter had a friend over and she was terrific - she asked to try the salad and said she really liked it. That was a surprise! My own kids wouldn't try it! The girl's mother texted me this morning to ask for the recipe and that her daughter was talking about the salad all morning - how great!
The tart flavor of the feta surrounds the watermelon so completely and the mint gives it all a big pop of fresh!
Watermelon and Feta Salad with Mint
3 cups of watermelon chunks
2 tablespoons of crumbled reduced fat feta
1 tablespoon fresh mint, chopped
Mix together and serve
Monday, August 11, 2014
Yogurt-Spiced Chicken: Recipe
Tonight's dinner was really easy, as I started it last night. I filled out the meal with store-bought Naan that I brushed with fresh rosemary and olive oil immediately out of the oven, as well as couscous, fresh tomatoes from my garden simply chopped and drizzled with olive oil and cilantro and a quickly made cucumber salad with red onion and mint. I made a package of chicken - a pound - and there was nothing left at the end of the meal.
Yogurt-Spiced Chicken
1 lb. chicken thighs
4 oz. Plain, nonfat, yogurt
4 garlic gloves, minced
1 tablespoon ground cumin
1 tablespoon paprika
1 tsp. cayenne pepper
1/2 cup fresh parsley
Chop parsley, pepper, cumin, paprika and garlic in a good processor and mix chopped ingredients into yogurt until well mixed. Place thighs in large plastic baggie and pour yogurt over. Seal bag, be sure to remove air from the bag, shake and coat all chicken pieces. Refrigerate at least 2 hours and up to 12 hours.
Prepare the grill for direct heat. Cook the chicken for about 15 minutes - roughly 7 1/2 - 8 min per side.
Monday, June 9, 2014
Lip Smackin' Good - Bourbon Laced Baby Back Ribs: Recipe
| Meredith's Food for Life |
The other day I walked into the butcher's shop and saw a gorgeous slab of baby back ribs (I realize I'm using the word gorgeous in relation to a piece of meat). But given the state of these ribs, I was compelled to take the package home and find a way to cook them up. Barbequing ribs can be challenging in that you don't want to blacken them during the cooking process but instead, you want to grill them to perfection, complete with marks and seared flavor. So I quickly scanned a few recipes and cobbled together my own based on the cooking methods and flavors I liked best and that best suited my timeframe for the day. No one wants to stand in the kitchen or in front of the grill on a glorious day.
My kids will eat anything I make, for the most part. At least they understand that when it comes to dinner, we are serious about eating and about trying food. That said, admittedly, they don't always love or rave about things I make but when they do...they sooo do! I cooked up three and half pounds of ribs for five people - that's two adults, two kids ages ten and eight and one very picky two year old. At the end of dinner there were no ribs left. Not one. None. My oldest ate about four ribs and my sick middle child came downstairs from his self-imposed hibernation to join us for dinner, even though he said he would not eat anything. We begged him to eat - to just take a bite - and when he did, he made a lovely mmmmm sound and proceeded to gobble up the rest of his plate. And even the littlest one, the one who is known to throw her food or drop it, seemingly on purpose, in front of the waiting dog, ate her whole allotment. Maybe it was the bourbon? Maybe it was the homemade mac and cheese that went with it? Whatever the reason, I loved the end result - no left-overs! And everyone was full - that makes for a very happy mommy-cook.
Bourbon-Laced Baby Back Ribs
Serves 4 (grown-ups)
3 1/2 lbs. baby back ribs, one slab cut in half
1/2 cup barbeque sauce
1/2 cup bourbon
1 tablespoon Dijon Mustard
2 tablespoons of Worcestershire Sauce
1/2 cup brown sugar, packed
1/4 cup red wine vinegar
pinch of cayenne pepper
1/8 cup Kosher salt
Preheat oven to 350.
In a medium saucepan, combine barbeque sauce, bourbon, mustard, sugar, vinegar, and pepper over medium-high heat. Bring to a boil and allow mixture to thicken, about 10 minutes. Cool slightly.
With paper towels, dry the ribs. Rub kosher salt over the entire slab, paying particular attention to the meaty side.
When the sauce has cooled slightly, pour 1/2 cup into the bottom of a baking dish that can accommodate the two halves side-by-side. Pour another 1/2 cup of sauce over the top. Using a pastry brush, brush the sauce into all sides of the meat.
Cover tightly and bake about 1 hour and 10 minutes. You can stop here, if you need to, and save it for another day - let the ribs cool down and then refrigerate them for a day. Bring to room temperature before you grill them.
If you're grilling the same day, you can set ribs aside for a few hours at room temperature. Heat grill to medium - high heat and grill ribs for about 10 minutes - be sure to move them around a few times so they don't burn (the sugar will cause them to burn easily). Let ribs sit for about 5 minutes, uncovered, before slicing in either one or two rib sections.
Sunday, May 18, 2014
Bacon and Everything Else: Recipe
![]() |
| Meredith's Food for Life |
Today was one of those beautiful days where the productivity level inside and outside of the house was so high and so intense that dinner had to be equally hearty and quickly prepared. I grilled steaks wrapped in bacon, roasted petite potatoes and sautéed Brussels Sprouts with bacon and honey and rounded out the meal with a salad of baby arugula, cucumbers and fresh strawberries. It was an easy and perfectly flavored meal - a little salt goes a long way.
. The honey lessoned the slight bitter flavor of the sprouts and the ying-yang of the salty bacon and sweet honey made this really worth eating. We loved it!
Brussels Sprouts with Bacon and Honey
1 lb. pkg., Brussels Sprouts, in steamer pouch
1 tablespoon olive oil
2 slices bacon, cut into 1" pieces
1/2 large shallot, minced
2 tablespoons, honey
Steam sprouts in microwave as per directions, about 5 minutes. Meanwhile, sauté shallot in very hot oil over medium high heat for about 5 minutes, careful not to burn. Add in the bacon and sauté well as it sweats - about 10 minutes, stirring often so as not to burn. Add in the cooked sprouts and sauté well for about 10 minutes, stirring often, again. Next, add in the honey and continue to sauté until sprouts are browned and bacon is thick and lost all of its fat - about another 8-10 minutes.
Monday, February 3, 2014
Butternut Squash Pasta: Recipe
| Meredith's Food for Life |
I'll admit that this is not a "quick meal for lunch" kind of thing. But I had butternut squash and wanted to make this recipe as I had just seen it in a magazine. I reduced the amount of squash, increased the pasta amount the recipe suggested and I used a whole grain variety instead of regular pasta. Also, I didn't have pancetta on hand but I did have prosciutto, so I used that. This was delicious and it wasn't difficult, just time consuming. The sauce was smooth and creamy and for a minute I felt very decadant. Then I remembered that it was all healthy!!
Butternut Squash Pasta with Sage and Proscuitto
1 lb. whole grain linguini
1 lb. butternut squash, peeled, seeded, and cubed
2 cups low sodium, no fat chicken broth
1 small onion, finely chopped
2 tablespoons fresh sage leaves, finely chopped
4 cloves garlic, minced
4 oz. Proscuitto, cubed
1 tablespoon olive oil
1/4 cup grated pecorino cheese
In a large sauté pan, heat oil over medium heat. Add in the Proscuitto and sauté for about 7 minutes. With a slotted spoon, remove the Proscuitto and set aside. Add in the sage, onion and garlic and sauté for about 5-7 minutes, until the onion is soft - stir often so the garlic does not burn. Add in the squash and the broth and bring to a boil. Lower the heat and let simmer about 20-25 minutes.
Meanwhile, bring water to a boil for pasta and cook linguini according to package directions.
When squash is about ready - soft enough to spear with a fork - pour entire contents of pan into a food processor or blender, along with 1 1/2 cups pasta cooking liquid (taken immediately before draining) and purée. Add more water, if need be. Toss with the hot pasta and toss with the Proscuitto and cheese. Sprinkle more sage if desired.
Fake-Out Fried Shrimp: Recipe
| Meredith's Food for Life |
Fake-Out Fried Rice
1 cup quinoa, cooked according to package directions
1/2 lb frozen uncooked shrimp, thawed and peeled
1/4 cup teriyaki sauce
1 egg, beaten
1/2 cup frozen petit peas, thawed
1/2 cup shredded carrots
2 scallions, minced
1 tablespoon olive oil
1 large garlic clove, minced
In a large non stick pan, heat 1 tablespoon olive oil over medium/high heat. Add in the shrimp and sauté until pink - about 6-8 min. Add in the carrots and sauté another 5 minutes. Push the shrimp toward the outside of the pan, making a space in the center. With the heat on high, pour the beaten egg into the center and let it form an omelette. With a wooden spoon, scramble the egg and then push together the shrimp and egg, like a traditional sauté. Next add in the peas and the garlic. Sauté lightly - about 2-3 more minutes, careful not to burn the garlic. Raise the heat and add in the teriyaki sauce. Let it boil for about 2 minutes and pour entire contents of the pan into a bowl with the quinoa. Mix well and add the scallions. You may want to add another 3-4 tablespoons of teriyaki sauce, depending on taste.
Sunday, January 26, 2014
The Mighty Meyer Lemon: Recipe
| Meredith's Food for Life |
They are gorgeous - their skin is smooth and buttery yellow. They are smaller than traditional lemons and much rounder. But it's the smell they emit when you slice them open - it's unlike anything you've smelled before - it's bright and has that familiar lemony smell but there is something else there - a punch of orange that catches you off-guard and I am certain they're grown in a field of fresh herbs. They are delightful and their simplicity is all you need - I use them to dress my salads and there is no need for oil this way. Recently I saw a list touting 100 things you can do with a Meyer Lemon but the only thing I wanted to do was pair them with one of my very favorite Sunday dinner foods - the mighty chicken.
I roasted the chicken together with the lemons and thought, briefly, about adding parsley and garlic during the cooking process but stopped short as I felt it would be overkill and somehow might actually ruin the flavor of of this simple dish. Instead, I opted for some coarse Kosher salt and a few shakes of the equally amazing Herbs de Provence. The result? Perfection - a perfectly flavored chicken.
| Meredith's Food for Life |
I purchased this package of Meyer Lemons from the local market - $3.99 for 6 of them - or roughly a pound. After making this recipe I have a few left and plan to use them for the remainder of the week.
Roast Chicken with Meyer Lemons
2 lbs. boneless, skinless, chicken thighs
2 lbs. chicken legs, skin peeled back or removed
3 Meyer Lemons, quartered + 1 more, halved
Kosher salt
1 tablespoon Herbs de Provence
1/2 garlic clove, minced
2 tablespoons fresh parsley, minced
Preheat oven to 450. Spray the bottom of a heavy roasting pan with non-stick spray. Using a paper towel, dry each piece of chicken thoroughly and place snugly next to one another into the middle of the pan - make two or three rows, depending on the size of the pan, if necessary. Do not crowd the chicken or stack them but make sure they are close together.
Sprinkle the chicken with salt - each piece should have salt on it. Next, sprinkle the chicken with the Herbs de Provence. Place a quartered piece of lemon at each point where two pieces of chicken meet. Use more lemons, if needed.
Roast about an hour and forty minutes. Meanwhile, combine the parsley and garlic in a small bowl.
Remove chicken from the heat when done and squeeze remaining half lemon lightly over the tops of the pieces of chicken and sprinkle with the minced garlic and parsley. Serve!
Labels:
Fruit,
poultry,
Recipe,
Spotlight of the Week
Thursday, January 16, 2014
Scamper - Scampi: Recipe
| Meredith's Food for Life |
The surprise, I suppose, is that most people would just pop something in the microwave and be done with it - but then, there's me. I am in the all-by-my-self-nutty-and-stupid category. Instead, I have to come up with something to make for dinner - regardless of the fact that I have several left-overs that can be made in 5 minutes or less. But to be fair, cooking and baking are the two things I can do to fill my, otherwise-void, creative outlet. I actually enjoy the challenge of "what can I make for dinner tonight?" I like to look in the fridge and figure out how to make something out of what looks like nothing to most people. My mother taught me that, really. Even when there is "nothing" in my house, I can still make 5 meals! And so, while it's utter mayhem in the house, and I walk in from a long day, I almost always crave the 20-30 minutes of time I take to make something appear on the table. I feel creative, I feel "motherly" and perhaps, more than anything else, I feel less guilt about being out of the house five days a week.
This was quick - Shrimp Scampi. So here's my suggestion - keep a frozen bag of uncooked shrimp in the freezer. Buy the largest ones - they really are the best. Buy the ones whose shells have been split down the backside. Run them under cold water for 5 minutes, being sure to move them around several times for even thawing, and they will be ready for your favorite recipe in no time. I thaw and peel them and throw them into whatever I am making. The longest piece of this recipe was the time it took for the water to boil.
Shrimp Scampi with Angel Hair
serves 8
3/4 lb. uncooked shrimp (see note above), thawed, peeled and drained
1 lb. angel hair, whole grain
6 large garlic cloves, minced
2 tablespoons Olive Oil, divided
1 medium zucchini, sliced very thin
1/2 pint cherry tomatoes, halved
1/2 cup fresh basil, chopped
1 tablespoon dried oregano
Juice of 2 lemons
salt and pepper
Boil a large pot of water for the pasta - add in the angel hair when the water is boiling and cook according the box directions - about 5 minutes. As the pasta water is near ready to boil, heat one tablespoon of oil in a large saute pan until very hot. Add in the zucchini and saute until wilted - about 4-5 minutes. Add in the shrimp and saute until they at least one side of them turn pink - add in a medium sized pinch of salt and several grindings of fresh pepper. Add in the tomatoes, garlic 1/4 cup of basil and 3/4 of the lemon juice. Allow the mixture to boil rapidly.
When the pasta is finished cooking, drain well and combine it with the sauce in a large serving bowl. Add in the remaining basil, lemon juice and the olive oil. Serve!
Tuesday, January 14, 2014
A Whole New Grain - Farro: Recipe
| Meredith's Food for Life |
Tonight's dinner was a roast pork loin with chopped salad, roasted potatoes, thinly sliced fresh fennel and this little dish made from Farro. Apparently it comes from Italy - and I say: "Wow" and "Who knew!?!" I wanted to see if it this grain, which is rice-like and nutty with a chewy texture once it's cooked, would behave like it's cousin: Arborio Rice.
At first, my kids were skeptical but once they tried it, they were hooked and suddenly I didn't think I had made quite enough for us. It look longer than the 15 minutes quoted on the package - but I also added some steps, most of which were completed quickly. It was delicious - and I was thrilled that when I walked away from the table I was full!
The pork roast wasn't finished cooking by the time the farro was complete so my kids suggested we eat the dish as our "appetizer." Man...we've taught them well!
Farro "Risotto" with Butternut Squash
serves about 8-10
1 cup farro, rinsed clean
1 medium onion, minced
1 lb. butternut squash, peeled and chopped in chunks (I purchased this pre-packaged from the store)
2 tablespoons unsalted butter + 1 tablespoon
1 14.5-oz can fat free, low-salt, chicken broth
1 cup water
1 cup frozen peas, thawed
1 tablespoon brown sugar
In a medium saucepan, bring enough water to a boil that is sufficient to cook the squash. Once the water is boiling, gently lower the butternut squash into the pot and cook - about 15-20 minutes, until a fork pierces the flesh easily, drain well. Next, thaw the peas and drain, set aside.
In a large shallow pan, melt 2 tablespoons of butter over medium-high heat until it foams gently. Add in the onion and saute until soft - about 6-8 minutes. Do not brown the onion, so lower the heat if needed. Next, raise the heat to high and add in the farro and mix well with the onion and butter until well coated and toasted - about 2 minutes.
Add in the broth and the water, gently, and mix well. Allow this mixture to cook over medium heat for about 15 minutes. Then, raise the temperature and boil the liquid until it reduces completely - about another 10 minutes - and stir often so the farro doesn't stick to the bottom of the pan. Once the liquid has been cooked off, add in the squash and the peas, an extra tablespoon of butter and stir well. Add in the brown sugar and serve.
Labels:
No-Meat,
Recipe,
Sides/Salads,
Vegetables,
Whole Grains
Subscribe to:
Posts (Atom)