Search This Blog

Showing posts with label Vegetables. Show all posts

Tuesday, January 14, 2014

A Whole New Grain - Farro: Recipe

Meredith's Food for Life
I am amazed at these whole grains that I never knew anything about before just recently. In my latest food magazine, they highlighted whole grains, clean eating, and so on. So as I've mentioned, I wanted to challenge myself to find out what theses things were all about and find ways to incorporate them into our lives.

Tonight's dinner was a roast pork loin with chopped salad, roasted potatoes, thinly sliced fresh fennel and this little dish made from Farro. Apparently it comes from Italy - and I say: "Wow" and "Who knew!?!" I wanted to see if it this grain, which is rice-like and nutty with a chewy texture once it's cooked, would behave like it's cousin: Arborio Rice.

At first, my kids were skeptical but once they tried it, they were hooked and suddenly I didn't think I had made quite enough for us. It look longer than the 15 minutes quoted on the package - but I also added some steps, most of which were completed quickly. It was delicious - and I was thrilled that when I walked away from the table I was full!

The pork roast wasn't finished cooking by the time the farro was complete so my kids suggested we eat the dish as our "appetizer." Man...we've taught them well!

Farro "Risotto" with Butternut Squash
serves about 8-10

1 cup farro, rinsed clean
1 medium onion, minced
1 lb. butternut squash, peeled and chopped in chunks (I purchased this pre-packaged from the store)
2 tablespoons unsalted butter + 1 tablespoon
1 14.5-oz can fat free, low-salt, chicken broth
1 cup water
1 cup frozen peas, thawed
1 tablespoon brown sugar

In a medium saucepan, bring enough water to a boil that is sufficient to cook the squash. Once the water is boiling, gently lower the butternut squash into the pot and cook - about 15-20 minutes, until a fork pierces the flesh easily, drain well. Next, thaw the peas and drain, set aside.

In a large shallow pan, melt 2 tablespoons of butter over medium-high heat until it foams gently. Add in the onion and saute until soft - about 6-8 minutes. Do not brown the onion, so lower the heat if needed. Next, raise the heat to high and add in the farro and mix well with the onion and butter until well coated and toasted - about 2 minutes.

Add in the broth and the water, gently, and mix well. Allow this mixture to cook over medium heat for about 15 minutes. Then, raise the temperature and boil the liquid until it reduces completely - about another 10 minutes - and stir often so the farro doesn't stick to the bottom of the pan. Once the liquid has been cooked off, add in the squash and the peas, an extra tablespoon of butter and stir well. Add in the brown sugar and serve.

Sunday, January 5, 2014

Time for a New Approach: Recipe

Meredith's Food for Life

Isn't it normal for people to turn the page of the calender from one year to the next and realize that there is a chance for a whole new beginning?  I certainly think it is and like most people, I made a mental note of the things I want to improve upon or jettison from my life. The list isn't too long but it is meaningful. And then - as an aside to a "real" list, there is the stuff I want to improve upon in the kitchen. I want to branch out and try new grains - whole grains like millet, farro, red quinoa and steel cut oatmeal.  I'm really excited to reignite my love for new foods.

Tonight I made a tamer version of a recent recipe I saw in Bon Appetit mag for black and wild rice with roasted squash.  I changed the vegetable, lightened up the amount of oil and lost the pistachios it called for - and, well, I didn't add in the micro-greens, either. Despite the initial stares, this was a big hit at home and it looked so pretty - we've been teaching the kids about the importance of a colorful plate.  While I'm sure it could have been a meal all by itself (especially if I had kept in the pistachios), I served this alongside a glorious roast chicken and steamed carrots. This was easy. These grains are so good for you, so filling, and so easy to prepare and I am enjoying the process of getting to know them.  Yesterday for lunch I made quinoa with sauteed shrimp, broccoli, carrots tossed in a soy and chili garlic sauce - lunch was made in about 15 minutes and I was full for the rest of the day.

Wild Rice with Roasted Sweet Potato
serves about 8-10

1 cup wild rice, uncooked
1 3/4 cup water
1 1/2 Tbsp. olive oil + 1/8 cup
4 medium sweet potatoes, peeled and quartered
1/4 cup apple cider vinegar
2 tsp. honey
2 scallions, chopped
1/4 cup pomegranate seeds
salt, pepper

Preheat oven to 450. Bring to a boil the water and rice together, lower, cover and simmer for 45 minutes. Turn off the heat, let stand, covered, for ten minutes - then fluff with a fork and allow rice to cool.

Meanwhile, prepare cookie sheet with a light spray of non-stick spray. Toss potatoes in 1 1/2 Tbsp, olive oil and turn out onto the prepared sheet. Season lightly with salt and pepper and roast for 35 minutes.

In a large bowl, mix together the prepared rice with the scallions and seeds and then mix well.  Add in the potatoes and gently fold. In a small bowl, whisk together the honey, vinegar and the 1/8 cup oil. Pour over the rice mixture and gently fold, again.  Rice can be made an hour or so ahead of time and left at room temperature.  Mix again before serving.


Thursday, May 16, 2013

The Great India: Recipe


The final stop on this week's tour of International foods was a personal favorite of mine - Indian food. I wouldn't say I have a vast knowledge or experience with this type of cuisine, but I did take an Indian Food cooking class some time ago - a three-session class where I came away with some amazing recipes and some great tips. Tonight's dinner was about simple but flavorful Indian-inspired foods made with relative ease.

The kids were introduced to Indian food about five months ago - it was one night between Christmas and New Year's when I launched into a crusade to try and pursuade everyone that we should go out for Indian food.  My oldest was all for it (she had never eaten this type of cuisine before but she was game) and because she was willing, so was my middle guy. That left my husband who likes Indian food but it isn't his "go-to" food when he wants something interesting but he, too, went along with the idea,  since we were all in agreement.  My daughter and I set about to a place that wasn't too close to home but that I knew had good food and we ordered the entire left side of the menu, as I usually do when ordering take out. We brought it home and once we began to dig in, the kids were actually vocal about how good the food tasted.  So tonight's dinner was an easy sell and in fact, when my oldest only saw the chicken on the table she asked me what had happened to the International theme for this evening...

I started the chicken last night - and with full disclosure here, I can tell you that I used a packet of garam masala that was brought back to me by my mother on her recent trip to India. So I was thrilled to have the spice blend on hand. If I hadn't had the packet of garam masala, I would have made my own blend of with: ground cumin, ground corriander, ground ginger, ground cloves, ground all-spice, ground cinnamon, ground chili powder and some ground tumeric. You could do any set of proportion with those ingredients and you would have an amazing blend of herbs and spices.  You can purchase garam masala at any Indian Market or at many local supermarkets. The flavors here really worked and I think I surprised myself! I was pleased with the way the chicken came out but even more so with the chick-pea recipe.  If you like chick-peas, make this - really.  And the rice? Please...I used Success brand Basmati Rice (that's rice in a plastic packet that gets boiled for about 10 minutes.). I added frozen petit peas that I simply ran under hot water for 2 minutes to thaw and I thought about adding a whole clove but forgot.  The meal was rounded out with mashed sweet potato that I added 1 tablespoon of butter to, along with 1/2 cup of brown sugar and 1/4 cup of low-fat milk. The baby couldn't get enough of that!

I didn't follow any recipe for this - I just gave it the ol' college try and I was really pleased with the results. I was even more pleased that everyone asked for more and that my son announced that I was the best cook he'd ever met!

Tandoori-Style Chicken with Curried Chick-Peas
serves 6-8

2 1/2 lbs chicken thighs and legs, skinless
12 oz. plain, low-fat, yogurt
2 1/2 tablespoons garam masala

Starting the night before you wish to cook the chicken, combine in a small bowl the yogurt and the spices and mix well. Place the chicken into a large zipped bag and pour the yogurt mixture into the bag. Zip the bag, release the air from inside, and gently but purposefully, shake the bag and coat all the pieces of chicken. Place in the refrigerator overnight.

Prepare the barbeque and cook the chicken for about 20-24 minutes.

Curried Chick-Peas
serves 6-8
1 tsp. olive oil
15 oz. can chick-peas, washed and drained
1 small-medium onion, thinly sliced
1 large garlic clove, smashed and minced
1/4 cup fresh cilantro
1 1/2 tablespoons garam masala
2 medium-large fresh tomatoes, chopped
1/4 cup canned tomato sauce
1/4 cup heavy cream

In a large saute pan, heat olive oil over high heat and add onion. Saute about 5 minutes, stirring regularly so they don't burn. Lower the heat, if necessary. Sweat the onions a total of about 7-8 minutes or until they are very soft.  Add the garam masala and mix well for about 1 minute. Next, add in the chick-peas and saute about 5 minutes, stirring occassionally.  Next add in the fresh tomatoes and stir again.  Add the garlic and saute for 1 minute and then add in the sauce and stir well.  Next add in the cream and stir.  Allow all the flavors to meld over medium heat for about 5 more minutes and add in the cilantro and stir.  Serve with rice.

Monday, May 13, 2013

International Week - First Up: Asia: Recipe

Recently, I was in California for business and came to the realization that the food there is so vibrant and diverse.  Just to give you an example of what I mean...for lunch one day I had a three-color beet salad;  it's tough to find that here without going on a wild goose chase and paying a fortune at the local "Whole Foods" market, for example. Needless to say, I left the Left Coast..inspired!

So as I gathered my thoughts for this week's menu, fresh fish called to me. This week the kids and I have planned an International Week of food - tonight we had Asian inspired items, tomorrow is Taco Tuesday, of course. Wednesday will be Brazilian or Argentinean Steak followed by Indian-inspired Thursday. Friday, naturally, will be pizza night (a.k.a. Italian Night!). The kids were thrilled for the variety and dinner sounded like fun to them.

We ate Salmon Teriyaki (shrimp for my oldest who doesn't like Salmon) with Mango-Strawberry Salsa, Lime-Infused Jasmine Rice and Pan-Steamed Baby Bok Choy. The plate was colorful and it felt exotic, which made it exciting for the kids and relaxing for my husband and I while the kids ate peacefully. Nothing was difficult or tricky - I just spent a few minutes chopping all the items.  I rounded this out with a salad made of lettuce, cucumber, orange bell pepper, radish and macadamia nuts dressed lightly with olive oil and rice wine vinegar. Even the baby screamed out for more (and I have a picture to prove it!).

Salmon Teriyaki With Mango-Strawberry Salsa
serves 5

1 1/2 lb. Organic Salmon fillet
1/2 cup barbeque sauce
1/2 cup low sodium soy sauce
1 tsp. dark sesame oil
1 tsp. ground ginger
1 tsp. ground coriander

Mango-Strawberry Salsa
2/3 large, ripe, mango - peeled and diced 1/3 large cucumber, peeled and diced
4 large ripe strawberries, hulled and diced
1 tablespoon fresh mint chiffonade
1/4 scallion, minced
juice of 1/2 lime

In a medium bowl, combine barbeque and soy sauces with sesame oil and two spices - whisk well.  Place salmon, skin side down, in a large glass dish. Pour the well-mixed sauce over the fish and allow to stand at room temperature for about an hour. Prepare the barbeque with coals on one side and spray the grill grate with non-stick spray (do this away from the fire!). Cook the salmon on the side without the coal underneath it - skin side down - for about 10 minutes (place cover on the grill). Carefully flip the fish and cook again another 8-10 minutes, depending on the thickness of the fish (again, cover the grill).

For the Salsa - combine all ingredients in a medium bowl and gently mix together.

Pan-Steamed Baby Bok Choy
3 large bunches, baby bok choy - root end snipped, leaves separated and washed well
1 large garlic clove, smashed but not separated
1 teaspoon, fresh ginger, peeled and minced
1 tsp. dark sesame oil
2 oz. water

In a large pan, heat oil well over medium-high heat.  Add the garlic and swirl around in the hot oil so the flavor releases - do not allow it to burn (about 1 minute or so). Next, add the ginger and shake the pan lightly so the flavor and the pieces of ginger are all over the pan. Add the bok choy - as long as it's still slightly wet, you'll hear a hiss when the leaves hit the oil. Cover quickly and allow the leaves to wilt - stirring once or twice - about 5 minutes. Remove the cover and add the water. Raise the heat and cook another 7 minutes or so, until the bok choy is truly wilted and limp. Serve hot.

Lime-Infused Jasmine Rice
Serves 4-5
* I used "Success Rice" in a bag for this (I know...) so once the rice was finished cooking and had been drained well, I squeezed a half a lime over the rice and mixed well.


Thursday, July 5, 2012

Ribs and Corn - A Great American Tradition: Recipe


I know I'm a day late here, but by the time I finished cleaning up yesterday, it was too late to post anything but my own head on the pillow.

A great July 4th for me is one spent with friends and family, naturally - with good food and lots and lots of laughs. While we all love hot dogs and hamburgers, we decided to raise the bar with some slow cooked baby back ribs and some BBQ'd corn on the cob. Dinner was rounded out with an easy pasta salad and a great big watermelon that I actually walked one mile - in both directions - to get. Why? That's a story for another day..

These ribs were so easy to prepare and with my husband's expertise at the grill, they came out great! I like a hint of cinnamon on the meat and I love a little tinge of spice.  These had the perfect combination of both.

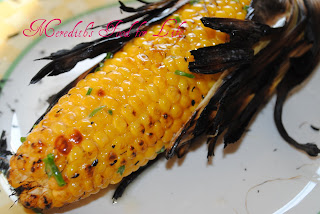
The corn was cooked on the grill in its husk and when it was finished, my daughter thought they were actually ruined because of the blackened edges of the husk.  They were far from ruined and with a brush of some chive butter, they were a real delight.

Cinnamon-Jalapeno Baby Back Ribs
4 lbs baby back ribs, cut individually
1 1/2" slice off the end of a small jalapeno pepper
1/4 cup brown sugar
1 teaspoon ground cinnamon
1/4 cup light corn syrup
1/2 teaspoon ground cumin
1/2 teaspoon ground coriander
1/4 teaspoon ground ginger
1/4 cup balsamic vinegar
2 cloves of garlic

Combine all the ingredients (except for the ribs) in a food processor until all ingredients are finely chopped. Using a basting brush, fully coat all the ribs before placing them on a tray or in a plastic bag and into the refrigerator for at least six hours and up to eight hours.

Stack charcoal on one side of the grill kettle and bring to high temperature.  Place the ribs on the rack over the opposite side of the grill from where the coal stack is and cover the grill.  Turn the ribs every 6-8 minutes  - always keeping them away from the direct fire of the coals and recovering after each turn. Ribs should take about 40 minutes to cook.  Allow them to stand at room temperature for about 10 minutes before serving.


Chive Butter Grilled Corn
6 fresh corn on the cob ears, husks pulled back (not removed) and silk removed
3 tablespoons unsalted butter
1 tablespoon fresh chives, minced

Once the silk is removed from the corn, pull the husks back onto the corn, covering the cob as completely as possible.  Roast the corn on the grill on one side of the grill - with the coal stacked in the kettle on the opposite side. Turn and rotate corn every 6-8 minutes. Recover kettle after each turn - total cooking time about 20-25 minutes.

Melt butter in a microwaveable dish or in a pot on the stove. Add in the chives and mix well.  Using a pastry brush, baste the corn cobs with as much or as little butter as you prefer.

Wednesday, June 27, 2012

Grilled Chicken Salad: Recipe


Grilled chicken can be a real treat if done well but it can also be incredibly boring. I've said it before...it's a necessary food - high in protein and low in fat and calories, it's the 'diet wonder-food.' I made a simple marinade and allowed the chicken to steep for about 30 minutes while I did some other prep work. Pairing grilled chicken with grilled and fresh vegetables made for a really lively mouthful! This is one dish that will reappear on our table before the summer's out, for sure.

Grilled Chicken Salad
serves 4-6

1 lb. chicken cutlets
1/4 cup olive oil
Juice of 1 lemon and 1 lime
1 tablespoon balsamic vinegar
1 tablespoon kosher salt
Fresh grindings of pepper
2 tablespoons fresh basil

For the Salad
1 medium green zucchini, sliced thin lengthwise
1 medium yellow zucchini, sliced thin lengthwise
1 small fresh tomato, chopped
1 medium yellow pepper, top and bottom sliced off and body quartered
2 medium carrots, shredded
1/3 cup olive oil
1/4 cup sherry vinegar
1 tablespoon salt
1 tablespoon fresh basil, minced

Heat grill.

In a large bowl, the olive oil, lime and lemon juice, salt, pepper and basil and mix well. Add the chicken into the bowl and ensure all pieces have been coated with mixture. Mix two or three times over the course of 1/2 hour - or longer - at room temperature.

Combine in a sealable plastic bag the remaining oil, sherry vinegar, salt and basil and mix well. Add the sliced green and yellow zucchini and yellow pepper. Seal the bag well and gently shake until all the pieces are well coated. Can be done 1/2 hour before grilling time.

Grill chicken over direct heat for about 8 minutes total - about 4-5 minutes per side, careful not to burn. Add the vegetables and cook another 4-5 minutes, turning several times to avoid burning them.

Place the chicken onto a platter and add the grilled vegetables on top of the chicken. Next add the shredded carrots and the chopped tomato on top. Allow mixture to sit for about 3-5 minutes before serving and be sure to pour some of the collected juices onto each portion.

Wednesday, February 29, 2012

Hey Chick (Pea)!: Recipe

Chickpeas are so rich in fiber and so very good for you that when I came across a recipe using them, I paused...and naturally I got to work.

I made this Mediterranean dish and it's great as either a light lunch or a pre-dinner snack - which is how I ate it! I was starving today and this low calorie-high fiber dish made me feel both virtuous and delighted while I made our "real" dinner.

Mediterranean Roasted Chickpeas
15 oz can chickpeas, drained and rinsed
3 garlic cloves, minced
1 tsp. olive oil
1 Tbsp. ground cumin
1 oz. feta cheese, crumbled
2/3 cup canned petite cut diced tomatoes
6 Kalamata olives, minced
1 tsp. dried oregano
1 Tbsp. fresh parsley, minced
4 whole wheat large pitas, each cut into 4 triangles - toasted

Preheat oven to 400. In a small ovenproof dish, mix together the beans, oil, garlic, and cumin. Roast for 20 minutes. Remove from the oven and mix in the cheese, tomatoes, olives and oregano and bake another 6 minutes. Sprinkle with parsley. Serve over pita.

Monday, January 9, 2012

Springtime Fare: Recipe

Well with spring-like temperatures here throughout the Northeast, it seemed only natural to lighten the dinner menu. Tonight's meal was easy to prepare and wasn't too heavy on the stomach which was terrific. With a nearly four-week old in tow, I admit that I enjoyed lightening up our meal considering today I was compelled to throw away the remaining half of the Sour Cream Layer Cake with Pecan Brittle sour cream cake because I simply kept eating it!

Pasta Primavera
1 lb. pasta
1/4 cup olive oil
5 medium garlic cloves, minced
1 zucchini, sliced very thin - into matchsticks about 3" long
20 baby carrots sliced in half longways
1/2 cup grated cheese
3 tablespoons reserved pasta cooking liquid

Bring a medium pot of water to boil and drop in the carrots for 4-5 minutes or until they're soft enough to spear with a fork. In the same pot, while carrots are in there, drop in the zucchini and continue to cook another 3 minutes. Drain the vegetables into a strainer with cold running water bathing them for 30 seconds to stop the cooking process. Drain well.

Meanwhile, bring pasta water to a boil and cook according to directions. Heat olive oil in a large pan over medium heat and saute the garlic over medium-low heat for about 5 minutes - do not burn!!! Add the cooked vegetables to the pan and saute well - increasing the heat slightly.

Before draining the pasta, ladle about 1/2 cup of the pasta liquid from the pot into a measuring cup and set aside. Drain the pasta and pour into a serving bowl. Mix in the cooking liquid, the oil and vegetables and gently mix. Add in the cheese and mix again. Serve.

Wednesday, January 4, 2012

Hearty Vegetable Sauce: Recipe

If you're like most people I know, you don't have a recipe for "sauce." Likely it comes out slightly different each time you make it - even if you use all the same ingredients each time. But tonight I needed to use a perfectly perfect eggplant before it became a victim of science in the fridge. My husband loves Caponata so I used that as my inspiration and came up with a thick and hearty sauce that was delicious and healthy.

Even with this recipe, be sure to experiment and use what you have on hand...

Hearty Vegetable Sauce
1/4 cup olive oil + 2 tablespoons
1 1/2 cup eggplant cut into small pieces (about 1/2 a large eggplant)
1 medium onion, quartered
4 garlic cloves, finely chopped
1 tablespoon dried basil
1 tablespoon dried oregano
1 medium green zucchini cut into small pieces
28-oz. can whole peeled tomatoes, lightly pureed
1/2 cup black Kalamata olives - pitted and finely chopped
1/2 cup red wine

In a food processor, chop the onion into fine dice and saute in heated olive oil over medium-high heat until soft and translucent - about 5 minutes.  Meanwhile, chop the eggplant and zucchini into smaller pieces and add them to the pot. Pour in the additional two tablespoons of oil and mix well. Lower the heat to a medium and saute about 10 minutes.  Add in the red wine and saute another 10 minutes until the vegetables are soft. Add in the herbs, garlic and olives and saute another 5 minutes over medium heat - stir well. Finally, add in the tomatoes and simmer about 20 minutes longer.

Monday, October 31, 2011

Halloween Roast: Recipe

On Halloween, my neighborhood becomes a feast for goblins, ghosts, and the like - thousands of children with their moms and dads all come upon this small 10 block radius and it is really fantastic.  It occurred to me today that (despite our handing out about 500 pieces of candy) so many of the neighborhood parents attend the festival of parades and the trick or treating throughout the day.  We're lucky!

This being the case, meant that I, too, took off for the day. There was a great deal of running back and forth today so naturally I was tired - but all that activity actually made me crave a solid home-cooked meal.  Whole chickens were on sale at the store today - buy one, get one free.  So I bought two and froze one.  Tonight's dinner was whole roasted chicken served with roasted asparagus as well as roasted vegetables, salad and rice.  A perfect meal to combat all that candy!!!

The vegetable platter was very easy to compile and didn't require a great deal of effort at all - in fact, nothing did.  All the prep work was done in about 15 minutes!  The kids didn't care for this dish though between my husband and myself, it was all gone. I love these flavors and the texture screams Fall.

Roasted Vegetables
1/2 medium leek, finely sliced
3 medium carrots, chopped
4 medium red skinned potatoes, finely sliced
2 medium zucchini, finely sliced
2 tablespoons olive oil
1 tablespoon grated cheese
salt and pepper

Preheat oven to 375.

In the bottom of a medium pie plate or casserole dish, spread out the chopped leek. Next, pile into a 3" circle all the carrots. In concentric circles, layer the zucchini and potato slices alternately.  Sprinkle with salt and pepper and drizzle with oil.  Sprinkle the top with the cheese and roast about 30 minutes. Raise the heat to 400 and roast another 10 minutes.

Thursday, November 18, 2010

March to a Different Beet: Food Idea

Recently in the grocery store, I saw bunches of huge beets and they begged me to take them home. So naturally, I acquiesced.  I couldn't help it - and in fact, my verbal enthusiasm seemed to encourage a beautifully pregnant mommy-to-be to pick up a bunch and drop them into her cart! (the store should pay me some kind of royalty).

Roasted beets must be one of the easiest things to do (or not do, as the case may be) and the way they smell indicates to me that there is an overload of vitamins stored up in those little balls!

Slice off the greens - you can wash and slice them up and they're very delicious in a salad - and wash the beets. Dry them off and wrap each one well in tinfoil and place on a baking sheet. Bake the beets on 350 degrees for about an hour and 20 minutes. Carefully open the foil packets and let cool. With a knife, carefully peel back the skins and toss them.  Slice the beets and serve with crumbled soft goat cheese and a ripe tomato.  Drizzle with olive oil, sprinkle crushed sea salt on top and lightly drizzle some balsamic vinegar as a final touch.

The result is wonderful and so very healthy. You feel terrific about eating them - and really, beets are an incredible food!

Sunday, September 12, 2010

Wild Mushroom Crostini: Recipe

One of the easiest things to make: a mixture of wild mushrooms.  By nature, mushrooms are already wild! Ever see a mushroom growing where you want one? Ergo: wild.

For this simple finger food, I sauteed 3 cups of finely sliced mushrooms (baby bellas, shiitake and oyster) with 1/2 onion, finely sliced and 2 Tbsp. Olive Oil. Once the mushrooms were soft and wilted, I added 1 tsp. fresh thyme and 1 Tbsp. balsamic vinegar.

I spread each toasted baguette slice with herb flavored goat cheese and topped with mushrooms.

Monday, September 6, 2010

Stuffed Tomatoes: Recipe

My neighbor retired long ago but when he did work he owned a produce market in Brooklyn, which might explain his magic touch when it comes to growing tomatoes. Recently the news has told us about how Long Island tomatoes have been infected by fungus and by bugs, killing off hopes of bumper crops and causing the price of these juicy red balls to sky-rocket. But I tell you that my neighbor, this very old man who now only comes outside when it's cool, is a tomato magician - the equivalent of Rumpelstiltskin with the ability of turning 15 feet of backyard into rows of Jack and Beanstalk-high plants filled with giant tomatoes.

Thankfully, he is also very generous - we are very often, particularly around now, the recipient of 8-10 tomatoes at a time.  Today I saw a recipe in Bon Appetit for tomatoes stuffed with "succotash" and I decided to give it a try - my way.

These were very good - juicy and light. You could serve this as a light dinner with some crusty bread to sop up the juices or you could serve it as a side dish, which is how it appeared on my dinner table tonight. I admit that I made too much filling for the number of tomatoes I carved out.  When I make this again, I'll add two more tomatoes. So I'm giving you the corrected version.

Last summer I made tomatoes stuffed with breadcrumbs and sausage, which was an amazing dish. Either way, using a tomato as a vessel is a great way to use up these highly sought-after balls!

Stuffed Tomatoes
6 ripe tomatoes, as prepared below
2 ears of corn, kernels sliced off the ear, about 1 cup
1 1/2 zucchini, cubed into 1 1/2" pieces
1 tsp. fresh thyme
2 Tbsp. fresh basil
1/4 cup fresh cilantro
1 small onion, chopped
olive oil

Preheat oven to 350.

Prepare tomatoes: cut a circle into the tops of each tomato, stem side, removing and discarding the stem. Make a very thin slice on each of the bottoms of the tomatoes so they won't fall over when sitting upright. Using a spoon, remove and discard the seeds from the tomatoes and place the remaining flesh into a mixing bowl. Repeat with each tomato. Place tomatoes upside down to drain.

Meanwhile, mix together the zucchini, thyme, basil, and cilantro with the tomato flesh. Stir. In a large pan, heat 1 tsp. olive oil over medium high heat. Toss in the onion and saute for 3-5 minutes, or until onion is soft and translucent. Add in the corn kernels and saute another 4 minutes. Mix onions and corn with the tomato mixture. Toss well.  Place each tomato, hole side up, onto a baking sheet. Fill the tomatoes with the mixture and drizzle a tiny bit of oil onto the filling of each tomato. Bake 25 minutes.

Remove tomatoes from the cookie sheet using a very sturdy spatula - the tomato will collapse if too much pressure is placed on it.

Thursday, April 1, 2010

Easter Sunday: Menu

I know that Easter and Christmas are religious holidays but for me there is nothing better than preparing a festive meal - for the mere sake of actually eating it with friends and family you love. You know I'd say that (and have said it) about Passover or Yom Kippur, as well, don't you?


Truth be told, this year has been a tough one for our family and this holiday has sort of crept up on me. Realizing I needed to prepare and plan, I set the menu while waiting for my daughter to finish her dance class. Once home, I tweaked it a bit and the finishing touches won't actually be complete until Sunday, of course. I tried to pit fancy against tried and true so that I could ensure an "easy" time of it. So here is the plan.

* A note about the lamb: I'm making this one up as I go along so I'll be sure to give a full report on the other side of Sunday. For now, I can tell you I've put a great deal of thought into this dish and I am super excited about it, thus far.


A Very-Spring Easter Sunday Menu

Hors D'Ouevres
* Clam Dip http://meredithsfoodforlife.blogspot.com/2009/04/baked-clam-dip-recipe.html
* Assorted Cheeses, Crackers and Fruit
* Kir Royale

First Course
* Fresh Mozzarella, Sliced Tomato and Fresh Basil with Olive Tapenade Olive Tapenade
* Shrimp Cocktail
* Proscuitto wrapped Melon Melon Wrapped with Proscuitto
* Stuffed, Baked, Zucchini Boats

Second Course
Penne alla Vodka http://meredithsfoodforlife.blogspot.com/2008/12/sauces-recipe.html

Salad Course
Field Greens with Red Pear, Walnuts and Gorgonzola with Lime Vinaigrette

Main Course
* Drunken-Roast Lamb Stuffed with Sundried Tomato, Spinach and Feta Cheese Drunken Roast Lamb
* Salad of Cold Petite Peas and Roasted Pepper Cold Peas
* Yukon Gold and Yam Mashed Potatoes
* Sweet Sautéed Carrots with Honey and Thyme Sweet Carrots

Dessert
* Assorted Fruit
* Giant Easter Basket
* Old Fashioned Coconut Cake Coconut Cake
* Red Velvet Cake Red Velvet Cake
* Ice Cream
* Pastry


Sunday, August 9, 2009

Summer Vegetable Gratan: Recipe


Last summer I made a gratan just like this one - a recipe that was not mine but rather Ina Garten's. It was wonderful, a big hit! Hers featured tomatoes, zucchini and potatoes along with Gruyere cheese. So I modeled this after hers since it was so delicious but away went the potatoes and in came eggplant and Parmesan. The cooking time was far less since the potatoes take a great deal of time in the oven. The summer is not a time to turn on the oven for any real length of time so this was perfect. My husband ate most of this and barely left any for the rest of us!! This feeds 4-6 servings. You can certainly double the recipe - you would have to for a larger group because everyone goes back for seconds!

Summer Vegetable Gratan
1 long Itchiban Eggplant, sliced into 1/4" thick rounds
1 large green zucchini, sliced into 1/4" thick rounds
2 large ripe tomatoes, sliced into 1/4" thick slices
1 medium onion, sliced thin
2 garlic cloves, minced
2 Tsp. fresh thyme, minced
4 Tbsp. olive oil, divided
1 Tbsp. lemon oil
1/4 cup Parmesan cheese
salt

Preheat oven to 375.

Drizzle the lemon oil on the bottom of a round pie dish (9"). Heat 1 tablespoon of olive oil in a large pan and saute onion over medium high heat about 10 minutes - until it's soft. Add the garlic and 1 teaspoon of thyme and saute another minute. Spread the onion mixture onto the bottom of the pie dish. Layer the eggplant, zucchini and tomato slices in an attractive array according to your taste (i.e., in concentric circles or straight lines across the plate).

Sprinkle salt over the pie plate and drizzle the entire dish with the remaining olive oil and remaining thyme. Cover the dish with foil and bake for 30 minutes. Remove the foil, sprinkle with cheese and bake another 5 minutes. Remove and cool about 15 minutes before serving.


Thursday, July 30, 2009

Fried Onions: Recipe


I love skinny fried onions - don't know what it is about the crispy little things that make me opt for them each time they're offered, but I love them! Here is my attempt (they were pretty good!).

Slice a large Vidalia onion into very thin rounds. Drop them into a mixture of flour, salt, pepper, and paprika. Drop them carefully into a - VERY HOT - heavy large pot of olive oil (don't overcrowd them - must do them in batches) and let them fry about 4 minutes on the first side and another 2 minutes on the second side. Drain on brown paper bags. Salt liberally.


Tuesday, July 14, 2009

Grilled Stuffed Portabello Mushrooms: Recipe


I think portabello mushrooms are terrific - they can actually stand alone as a meal with some crusty bread and good wine. How awesome is that? For a small price, you can have a "meaty-meatless" dinner. This was very quick and easy and, again, it can be served as a meal all by itself or as a side dish.

Improvising on this is very much OK! Try various stuffings (let me know how they come out!).

Grilled Stuffed Portabello Mushrooms
4 large portabello mushrooms, stems and black gills removed
8 oz. small assorted sweet peppers, thinly sliced
1 garlic clove, minced
1/4 tsp. dried oregano
1/4 tsp. dried basil
1 Tbsp. lemon oil
1 lb. asparagus tips
2 Tbsp. kalamata olives, sliced (no pits)
1/2 cup cherry tomatoes, halved or quartered
4 Tbsp. Olive Oil
1/2 cup crumbled goat cheese, divided
Four 1/2 Tsp. Sherry Vinegar
sea salt/pepper

Prepare the grill. Brush each mushroom, both sides, with 1 Tbsp. olive oil and grill about 3-4 minutes per side. Remove and reserve.

Meanwhile, heat the lemon oil in a large saute pan over medium high heat and add the garlic. Saute until fragrant - about 1 minute - and then add the asparagus and saute about 5 minutes. Add the peppers and the dried herbs, mix well, and saute another 5 minutes or until soft. Next add the olives and the tomatoes and saute another two minutes. Spoon about 1/2 cup of the mixture into the hallowed out portion of the mushroom and pour 1/2 Tsp. of vinegar into the center of each mushroom. Sprinkle with sea salt and a few grindings of pepper. Divide cheese evenly over each mushroom.


Thursday, July 2, 2009

Pineapple Pork Chops and Goat Cheese Stuffed Mini Peppers: Recipe


I try to imagine what would be interesting and exciting for the summer barbecue using the pork chops in the refrigerator. I search through some recipes and then take a mix and match approach. I love muted spices - quiet ones - not necessarily "in your face look at me I'm really hot" spice. That's tough to take. And to counter the smokey flavors I like, I love to use fruits and vegetables that are in-season, naturally. Meanwhile I stare at the package of adorable mini sweet peppers I bought in the market...hmmm, what to do with them?

I start with good meat and then look inside the pantry for the spice combo that will work well - simple: olive oil, cumin, coriander and salt. Then I imagine the pork with something sweet and I take from a recipe: pineapple!

Back to those peppers, quickly. I wanted to stuff them so I thinned out some awesome goat cheese with a bit of olive oil and added the extra salty flavor of a green olive tapenade.

These would be a great hors d'ouevre for a party because they look so pretty and are easy to eat with your hands. A perfect party food.

Pineapple Pork Chops
1 1/4 lb. pork loin chops
1 Tbsp. ground cumin
1/2 tsp. ground coriander
1/2 tsp. salt
2 Tbsp. olive oil

8 oz. can pineapple rings, drained and chopped
1/4 cup pomegranate seeds
1/4 tsp. minced jalapeno
1 white peach, diced
juice of 1 lime

Prepare the barbecue.

In a small bowl, mix the salt, cumin and coriander. Next drizzle in the oil and whisk well. Smear each chop, both sides, with the mixture and let sit in the fridge for about 30 minutes.

Meanwhile, combine all other ingredients in another bowl and gently mix.

Grill chops about 7 minutes per side over direct heat and serve with salsa on the side.


Goat Cheese Stuffed Mini Sweet Peppers
3.5 oz. four pepper Crottin Montchevre, room temperature
1 dry pint sweet mini peppers, slice off tops and remove core and seeds
1/2 cup jumbo, pitted, Sicilian Green Olives, in oil
1 garlic clove
3 Tbsp. Olive Oil + 3 Tbsp. Olive Oil + 1 Tbsp. Olive Oil
Salt

Prepare barbecue

In a food processor, combine garlic, olives and 3 Tbsp. oil and puree. Put cheese in a medium bowl and whisk in 3 Tbsp. oil so cheese is smooth. Add in the green olive mixture and mix. Set aside.

Grill the peppers quickly - about 2 minutes per side - and put on a plate. With a pastry brush, coat each pepper lightly with the remaining tablespoon of oil and sprinkle with salt. Once peppers have cooled to the touch, stuff each one with about 1 Tbsp. of the cheese mixture. Can be served warm or at room temperature.


Tuesday, April 14, 2009

Honey Ginger Carrots: Recipe


Carrots can be tricky - if you under cook them they can taste like the earth in which they grew. If you over cook them, they can taste like the garbage you get in a can. So where is the balance? You must tend to them to find the right moment to remove them from the stove - it's not a long time and it isn't a laborious task, but you want to be sure to get these right. Their natural sugar will be released as they cook and they will become candy sweet and tender, if done right.

These were very good - a hint of ginger and the rich flavor of honey made them sweet but not overpowering. They were just right. I also made these a day in advance and I think that helped to tenderize them. They were easy enough to reheat in the microwave - and quickly!

Honey Ginger Carrots
5 lbs. carrots - peeled and chopped 1/8" inch thick
2/3 cup honey
1/2 cup (1 stick) butter
1 tsp. ground ginger
1/4 cup chopped chives
1 Tbsp. crystallized ginger, chopped very fine

In a large pot, over medium high heat, melt the butter until foamy. Add in the carrots and mix well to coat in the butter - about 4 minutes. Add in the honey, chives, and two gingers and mix well. Cover, lower heat to medium, and let simmer about 20 minutes. Lift cover, mix carrots well and replace cover. Cook another 15 minutes before testing the carrots to ensure desired consistency.


Thursday, April 9, 2009

Roasted Peppers: Recipe


Homemade roasted peppers are super easy to make and add a real pretty dish to your table. These could not have been easier and they were made about four days before they're needed. Just remove them from the fridge about 2 hours before you'll use them to "warm-up" to room temp.


Roasted Peppers
6 peppers - assorted, red, yellow and orange
3 large cloves of garlic, crushed and minced
1 1/3 c. very good olive oil
1/8 tsp. dried oregano

Preheat oven to Broil. Prepare the broiling pan with foil on the bottom. Place all washed and dried peppers on the pan and broil about 20 minutes - turn once. Remove them and place into a plastic bag, zip the top, and leave for about 45 minutes. Remove peppers and peel off the skin. Slice off the top and remove the core and seeds and then slice into thin strips.

Into a large bowl, mix the garlic, oil and oregano. Place the pepper strips into the bowl and mix well. Allow the mixture to come together for at least an hour at room temperature or leave in the fridge for about 5 hours or up to 3 days. Allow them to come to room temperature before serving.