Search This Blog

Showing posts with label Spotlight of the Week. Show all posts

Sunday, January 26, 2014

The Mighty Meyer Lemon: Recipe

Meredith's Food for Life
If you've never smelled a Meyer Lemon you are missing a culinary delight that tickles the nose as well as the imagination. A Meyer Lemon is a cross between a lemon and (either - agriculturalists aren't 100% sure) a Mandarin or a regular orange. They are native to China and according to legend, were "discovered" for Americans by Alice Waters in her California Mecca, Chez Panisse.

They are gorgeous - their skin is smooth and buttery yellow.  They are smaller than traditional lemons and much rounder. But it's the smell they emit when you slice them open - it's unlike anything you've smelled before - it's bright and has that familiar lemony smell but there is something else there - a punch of orange that catches you off-guard and I am certain they're grown in a field of fresh herbs. They are delightful and their simplicity is all you need - I use them to dress my salads and there is no need for oil this way. Recently I saw a list touting 100 things you can do with a Meyer Lemon but the only thing I wanted to do was pair them  with one of my very favorite Sunday dinner foods - the mighty chicken.

I roasted the chicken together with the lemons and thought, briefly, about adding parsley and garlic during the cooking process but stopped short as I felt it would be overkill and somehow might actually ruin the flavor of of this simple dish.  Instead, I opted for some coarse Kosher salt and a few shakes of the equally amazing Herbs de Provence. The result? Perfection - a perfectly flavored chicken.

Meredith's Food for Life
Dinner was rounded out with steamed asparagus and lemon, whole wheat couscous, oven roasted sweet potato "fries" and a salad of radish, cucumber, red onion, yellow pepper, cherry tomatoes and toasted whole wheat bread lightly drizzled with red wine vinaigrette.

I purchased this package of Meyer Lemons from the local market - $3.99 for 6 of them - or roughly a pound.  After making this recipe I have a few left and plan to use them for the remainder of the week.

Roast Chicken with Meyer Lemons
2 lbs. boneless, skinless, chicken thighs
2 lbs. chicken legs, skin peeled back or removed
3 Meyer Lemons, quartered + 1 more, halved
Kosher salt
1 tablespoon Herbs de Provence
1/2 garlic clove, minced
2 tablespoons fresh parsley, minced

Preheat oven to 450.  Spray the bottom of a heavy roasting pan with non-stick spray. Using a paper towel, dry each piece of chicken thoroughly and place snugly next to one another into the middle of the pan - make two or three rows, depending on the size of the pan, if necessary. Do not crowd the chicken or stack them but make sure they are close together.

Sprinkle the chicken with salt - each piece should have salt on it. Next, sprinkle the chicken with the Herbs de Provence. Place a quartered piece of lemon at each point where two pieces of chicken meet. Use more lemons, if needed.

Roast about an hour and forty minutes. Meanwhile, combine the parsley and garlic in a small bowl.

Remove chicken from the heat when done and squeeze remaining half lemon lightly over the tops of the pieces of chicken and sprinkle with the minced garlic and parsley. Serve!


Thursday, April 11, 2013

The Best Tasting Beef I 'Ever Heard': Recipe

No, seriously. This dinner was amazing - really! For those of you who know my cooking by now, you know that I am a huge fan of the marinade. I use it all the time to save my meats from my own stupidity (i.e., I'm too tired tonight to cook, let's order in...) so that I'm not wasting countless dollars by throwing away food that has past its prime.  But this?  Well, really, I've discovered a new way to make beef for those days when I'd forgotten to marinate it and want to eat it right then and there!

I've been fiddling around with new ideas for foods as I'm trying - like everyone else - to shed a few "L" "Bees" before the shorts come out. So I didn't want to add too much extra to this and have it wind up being a costly night's dinner with regard to calories and/or fat.

The flavor on this was so spot on that each bite my husband took garnered that, "mmmm" sound - I don't even think he was aware of it until the kids told him it was annoying. But the kids were doing it, too - and, to be fair, so was I. The key? Salt, garlic and the barbecue. Then add in the extras - homemade guacamole, salsa, and Chimichurri sauce - the three sauces were a "take your pick" kind of atmosphere in our house - as well as black beans and rice. At the end of the meal, everyone's plate was clean and I was a very happy mom.

This couldn't have been simpler.  If you don't have the time or inclination for homemade salsa (which I have a recipe for and I happen to think is awesome) or for DIY guacamole, then stick with the rice and beans - but I urge you to go ahead and make the Chimichurri sauce.  It was fresh, refreshing, and really simple.

Argentinian Steak with Chimichurri Sauce
1 1/4 lb. flank steak
3 tablespoons Kosher salt
1 large garlic clove, lightly smashed

1 cup cilantro
1 cup flat parsley
1/2 tablespoon capers
juice of 1 large lemon
2 tsp. olive oil
1 tablespoon water
1 small garlic clove

Preheat barbecue or broiler pan.  Sprinkle both sides of the steak with 2 tablespoons of salt and then rub the cut garlic clove all over both sides of the steak. Leave at room temp until heat source is ready.  If barbecuing, cook over direct heat for about 6-7 minutes per side. When the steak is placed on a platter, sprinkle with the remaining tablespoon of salt, or less, for taste.

Meanwhile, in a food processor, combine the remaining ingredients until a thick, but smooth, puree is made. Use more lemon, if desired.

Tuesday, February 26, 2013

The Incredible Edible Egg: Food Musings

Looking at this blog of mine, it's really hard to believe that more seven months have passed since I've posted something and even harder to believe that what I'm about to post is far from fabulous. So how do I explain months of inactivity?  One word: child. Isn't it amazing when you have the hang of something and a monkey wrench is thrown into the mix?  Well our littlest monkey is quite a handful, she is.  And add her to the mix of the two that came before and I'm a nutty mom with too many extra-curricular activities and overall lunacy in the house.  Don't get me wrong - in the past seven months, I've made dinner nearly every night, I cooked Christmas Eve for 12, a one-year old birthday party for 15 and assisted with desserts for Thanksgiving, among many other special things.  So I am still at it...it's just that the night seems to end there - with me finishing the last of the dishes, sweeping the floor for the 8th time that day, and staring blankly at the television set.  Writing and posting has taken a real back seat to surviving the every day that is our life.

So why am I writing today? Well, for one thing, I was inspired by a recent post of a new friend on her blog - and thought; "Crap, I'd better get back to blogging before someone pulls the plug on all that I've done thus far." And for another, it occurred to me as I swooped in to pick up my oldest from a playdate, that it was nearly 6:30 p.m. and no dinner was going to be had until nearly 7:00 p.m. So what is a Mom to do?  Dress up eggs, of course!  The French do it all the time and we think it's fabulous!

I often find that when time is at a real premium, the mighty egg makes a meal just that - mighty.  Protein and taste - what could be better (well, maybe the giant pack of Twizzlers I ate today, among many other things!) than a wholesome meal of perfectly scrambled eggs and "something."  You can fill in the blank with whatever you have!  We had a lightly dressed salad with our scrambled eggs and shredded Gouda Cheese and a pinwheel chicken sausage I broiled quickly. Along with it, I baked up some 5-minute french fries, since I didn't have time to fry them.  I could have added some toast and then we would have had a perfect meal - well, actually, I poured myself a glass of wine so the meal was completely perfect. Dinner was on the table in 15 minutes and it was devoured in an even shorter time frame.

Eggs are incredible...think of all the ways we use them: souffles, quiche, scrambled, poached, fried, over-easy, in cakes, in meringue, in flourless chocolate cake, and so on.  They are a wonder to behold and they often serve as my go-to breakfast: I submerge an egg in boiling water for about 23 minutes and peel the shell immediately under cold running water.  Then I sprinkle a pinch of Kosher salt and a few grindings of pepper and I shove the slices down my throat as I race out the door!  But, hey...a healthy meal doesn't have to be long and drawn out!

Try some of these ideas when you're pressed for time - eggs are sure to please every time!


Thursday, February 10, 2011

Ode to a Great Man: Recipe and Food Musings

This week was the one year anniversary of my step-father's death. He died of a massive heart attack on Superbowl Sunday 2010 and it was a terrible blow to my family.  He was so loved by us all and we miss him very much.  He was a very funny man who loved to tell a great joke or make a quick jab to lighten a mood and when you were the target you knew it was said with love.  He would have loved this story and I am hopeful that he's looking down on us and getting a great chuckle.

The Saturday before this year's Superbowl, I went food shopping for the week.  I had a seen on TV a commercial for some kind of "Mexi-Melt," as I've started calling it, but it's far less fancy than its name implies.  It's a microwaved concoction of Velveeta and salsa. I know - it sounds both revolting and delicious at the same time. I allowed the "yum" factor to take hold - even while my husband cringed at the same commercial. My husband, mind you, has been known to splurge on such "gourmet" items as White Castle, McDonalds, or Taco Bell (the one place I wouldn't go to if I were starving and living on the street).  I digress...

So purchasing Velveeta is a complete and utter anomaly for me - I know you'll roll your eyes, but truthfully I've only bought Velveeta a handful of times in my life and the last time had to be about 15 years ago!

As I came to the last aisle where the cold items are - cheese, eggs, yogurt, etc., I had trouble finding the big block of Velveeta - all I could find were packaged slices. I took the package of sliced cheese, imagining it melted the same way as the block, and drove my cart to the store manager - who sees me and must realize that his weekly numbers are satisfied when they ring up my weekly food bill - and asked him if they had actually sold out of the block of Velveeta for the "big game."  He leaned in close to me and sort of whispered: "See that frozen aisle?" I nodded. "Go to the end of it and keep going...to the display of 'non-refrigerated' cheeses."  I must have looked petrified but I did as I was told - I walked back as far as I could go without walking into the "back" and I found the cheese block. I grabbed one - praying no one could see me - and returned the slices to their rightful place.

All I kept thinking was: if my step father could see me now, he'd be howling laughing! The food snob had actually purchased cheese from a 'non-refrigerated' cheese wall.  And then I started to laugh...how disgusting is that???

I made my Mexi-Melt with my homemade salsa and the kids LOVED it, ironically. But we didn't use it all up, of course.  Which leads me to this - when staring into the cavernous fridge three days later, I saw three items that popped out to me and instantly I knew what to make for dinner:  Chicken with Cheese and Broccoli!

A long time ago, in fact it may have been the last time I had Velveeta, I came home to my parents all excited with a new dish: Chicken with Cheese and Broccoli - a perfect one-pot meal.  I made it for my parents and my step-father loved it but my mother was less than pleased (another food snob - x10).  She decided another time to make the same dish - but she chose to use some other "fancy" cheese and it was horrible! My step-father told that story over and over and over and ultimately the story changed so that both she and I would not use the Velveeta (which melts beautifully) but instead we both insisted on using the fancy (read: snobby) cheese. Not true. But "never let the truth get in the way of a good story!"

Moral of the story? Eat your Velveeta. Believe it or not, the box actually says: it melts better than cheddar (true) and it's less fat and there is nothing artificial in it!  My kids loved this - thought it was "awesome," making it an instant success. We (reluctantly!) like Velveeta!  Miss ya, Grandpa!

Chicken with Cheese and Broccoli
1 lb. chicken cutlets, cut into 1 1/2" chunks
6 oz. Velveeta, cut into 2" chunks
12 oz. SteamFresh (Bird's Eye) broccoli, cooked and trimmed
3 Tbsp. unsalted butter
1 tsp., each: salt, dried oregano, Adobe seasoning, ground savory and dried basil

Melt butter over medium-high heat in a large, heavy, pot.  Add in the chicken pieces and cook over medium-high heat until it begins to turn white on the outsides and light pink in the middle. Add in the spices and stir. Next add in the broccoli flowers and mix well. Add in the cheese and stir well until creamy and melted.

Serve with rice or plain pasta.

Wednesday, March 31, 2010

Drunken Lamb: Recipe


Lamb is a natural for Easter, right? Spring, re-birth, renew = a little lamb...yikes! That sounds morbid!

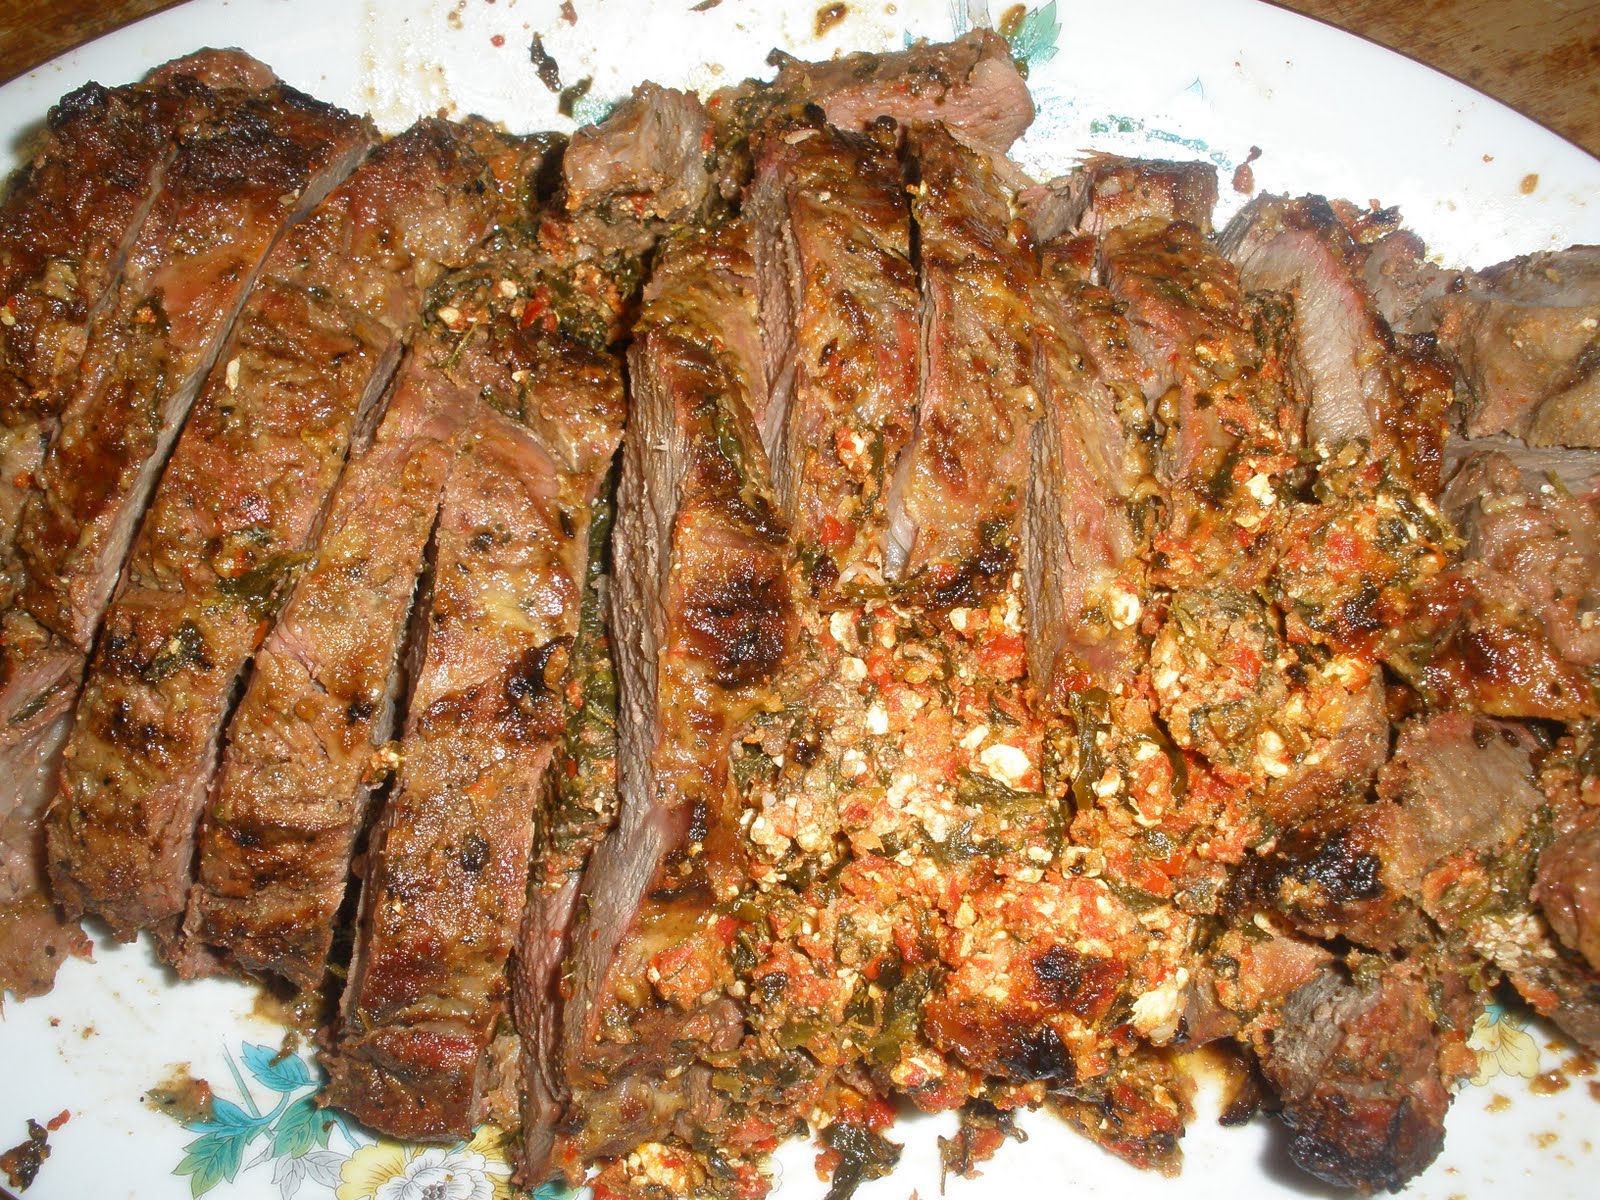
Okay, let's start that again...I love lamb! And Easter seems like a perfect time for it. This year, I wanted to do something I've not done before - a stuffed leg of lamb. I went to the butcher - highly recommended - and I asked the man for a butterflied leg of lamb. I told him I was having 13 people and told him I'd like to please keep the bones. (I have NO CLUE what to do with them but I'm sure I'll figure out something!)

What is butterflied, exactly? Well, it's simple, really. If you take a whole leg of lamb and slice it along the top with a very sharp knife and remove the bones and slice it a bit deeper, you can then open up the piece of meat - almost like a book - and it will resemble a butterfly. Preparing the meat this way will reduce cooking time, if grilled, and it will allow a marinade to penetrate the meat, more so than if you had the entire leg in tact. Quite frankly, holding up this giant piece of meat it occured to me that it looked like a pair of pants! It was funny, really.

The night before I was ready to serve this, I made the stuffing and put the whole thing together. Thank the Lord for my husband - I should really say that he put the whole thing together! And it was a comedy routine between the two of us.  I would urge you to ask for some help - folding and trussing a piece of meat this large by yourself if bound to be both frustrating and more frustrating.

So...WOW! This was a huge hit and it was delicious. I was really pleased. I think it would have been good if I had made it in the oven but the fact that I we made it on the barbecue and that my husband did as great a job on it as he did made this all the more incredible. I've added some "notes" below for your information.

Drunken Roast Leg of Lamb Stuffed with Sundried Tomatoes, Spinach and Feta
11 lbs. butterflied leg of lamb (no bone)
5 heaping Tbls. Dijon Mustard
1 cup Sauvignon Blanc - from New Zealand
2/3 cup olive oil
10 garlic cloves
1 tsp. fresh thyme
1 Tbsp. dried oregano
1 Tbsp. Kosher Salt

In a food processor, combine the mustard, oil, garlic, thyme, oregano and salt. Mix well - until all the garlic is completely minced. Into the shoot, pour the wine and continue to mix it in while motor is running.

Place the meat into a large throw-away roasting tin and lightly score the meat all over. Pour mixture over the meat and using a spoon and a fork, ensure all meat is well covered. Cover pan with foil and refrigerate for 3 nights.


Stuffing
1 very packed cup sundried tomatoes (not in oil)
1 10-oz. pkg. chopped, frozen, spinach - thawed and squeezed of any excess water
8 garlic cloves
1/4 cup olive oil
6 oz. crumbled feta cheese

In a food processor, combine the tomatoes, oil, and garlic until a smooth paste is formed. Combine it with the cheese and spinach in a large mixing bowl. Mix well.


Assembly
* Remove the lamb from the refrigerator and with a pastry brush, clear away a good amount of the marinade from the meat - do not discard
* Place the meat - bone side up - on a clean work surface (I placed it onto the foil that was used to cover the meat) with the two "pant legs" closest to you
* Overlap the two "pant legs" slightly so the entire piece looks like a rectangle
* Spoon the stuffing mixture onto the lamb - leaving a two inch border around the outside
* Cut yourself a very, very long piece of trussing string
* Fold and roll one long side of the meat toward the center at a time - both sides will be folded in toward each other, trying to keep the stuffing inside
* VERY tightly, tie a knot around the very end of one side and repeat with a second piece of string on the other side
* Next take the long string and tie knots every 2 inches - working your way from one end to the other and securing all the way
* Reserve the marinade and place into a bowl - cover and refrigerate
* Place the meat back into the tin tray and recover and refrigerate overnight


Cooking
* Set up the grill by placing an 8 or 9 inch tin pan in the center of the bottom of the grill. Spread the charcoal around the pan - in a circle and allow the fire to get super hot - we planned to put the meat on the grill at 2 p.m. and we started the grill at 1:15 p.m.
* Bring the meat to room temperature before cooking - to reduce cooking time and to allow the meat to get a crisp outside before continuing to cook over indirect heat. I left it out for 2 hours - in the same tin foil tray it was in and with the cover on it.
* Sear the meat: place it on the grill for 20 minutes - about 10 minutes each side. Do not cover the grill but rather leave it open to ensure a crisp outside.
* Baste the meat regularly - about 15-20 minutes - with the left over marinade. Each time you baste, turn the meat over to ensure even cooking and no burning or charring
* Be sure to add a few more coals to the grill as needed - over the course of about 2 hours we added coals about 3 times
* Cook the meat - (if using this many pounds) about 1 hour 40 minutes and allow it to rest on your serving platter, covered lightly with foil, for another 20 minutes before slicing
* Slice the meat on the serving platter it's already on - don't think you can move the meat with the stuffing...you can't!

Monday, January 11, 2010

Corned Beef - Jewish Style

Sorry there's no photo for this one - it was all gone before I realized I should have photographed it! But I promise you that this was perfect - simply perfect. The meat slid off the knife and the flavors were spot on. I researched the difference between Jewish and Irish Corned Beef - which I made once and it's on the blog: http://meredithsfoodforlife.blogspot.com/2009/03/corned-beef-from-not-so-irish-recipe.html. I couldn't quite tell why they were different other than the cabbage - at least from the recipes I was able to find. If you have some additional thoughts, I urge you to share them.

The term “Corned” comes from putting meat in a large crock and covering it with large rock-salt kernels of salt that were refered to as “corns of salt” This preserved the meat. The term Corned has beenin the Oxford English Dictionary as early as 888 AD. is beef that is first pickled in brine and then cooked by boiling. Usually, cuts of meat are used that feature long muscle grain, such as the brisket.

According to the History Channel, while cabbage has long been a traditional food item for the Irish, corned beef serving as a substitute for Irish bacon, first became traditional in the late 1800s. Irish immigrants living in New York City's Lower East Side learned about this cheaper alternative to bacon from their Jewish neighbors.

So you can see that there can't be a tremendous difference...it's all about the same! Regardless, I've tried to create the flavors that I know best from the many Jewish deli counters I've been to over the years.

I can honestly say there wasn't a morsel left over - and it really did taste great on a slice of rye with mustard and sauerkraut! Really! All I needed was a Dr. Brown's Cream Soda and a plate of greasy fries...

Jewish Corned Beef
2 Lbs. Corned Beef, Thin Cut
1/8 tsp. whole cloves
1/8 tsp. whole peppercorns
1/8 tsp. mustard seed
1 Tbsp. Kosher salt
2 onions, halved
4 carrots, peeled and chopped into 2 1/2" pieces
3 celery stalks, chopped into 2 1/2" pieces
2 bay leaves

In a large pot, place the vegetables and the meat and cover generously with cold water. Add the spices and bring to a boil. Skim off the foamy white fat on top and reduce heat to a heavy simmer. Do not allow this to boil. Cover 90% with the lid and let it cook about 5 hours. Turn once about half-way through.

Bring the pot to room temperature and refrigerate overnight. Skim off any fat that has accumulated on top and reheat, gently, covered, for about 35 - 40 minutes. Slice thinly and serve.


Wednesday, December 23, 2009

'Twas The Night Before Christmas (Eve): Menu


I really can't believe that it's the night before Christmas Eve. I wonder where the time has gone, to be honest. It feels like just yesterday we said goodbye to our Christmas Eve guests and put away all the dishes. Hmmmmmm...oh well, the calender really did move!

This year I got to planning the menu much later than usual - seems I couldn't get control over the "to-do" list and the time got away. So instead of pouring over books and recipes, I'm going with what works and what we all like. So I am pleased with what I've come up with. It's a smaller group this year - we're 7 adults this year and only our two little ones - so I scaled back the amount of food on the menu (I tried!!) and certainly the quantity (again, I tried!!!).

Christmas Eve Dinner Menu

Hors D'Oeuvres
* Broiled Scallops wrapped in Pancetta (this is the recipe but I'm planning to use pancetta instead of prosciutto) (http://meredithsfoodforlife.blogspot.com/2008/12/scallops-wrapped-in-prosciutto-recipe.html)
* Hot Baked Clam Dip (http://meredithsfoodforlife.blogspot.com/2009/04/baked-clam-dip-recipe.html)
* Prosciutto and Asparagus Bundles
* Assorted Cheeses (Asiago, Manchego, and Provolone)


First Course
* Salad of Fresh Mozzarella, Cherry Tomatoes, Basil and Sundried Tomato Slices with Balsamic Drizzle
* Fried Calamari with Marinara Sauce (http://meredithsfoodforlife.blogspot.com/2008/12/sauces-recipe.html)
* Baked Clams (my mother in law makes these and they're wonderful!)
* Stuffed Mushrooms (from my mom...yum!)
* Grilled Artichokes


Second Course
* Lobster Ravioli and Petite Peas with Brandy-Tarragon Cream Sauce


Main Course
* Steamed Mussels with Arabbiata (Angry) Sauce
* Baked Shrimp with Tomatoes, Feta, and Ouzo (http://meredithsfoodforlife.blogspot.com/2008/12/baked-shrimp-dish-recipe.html)
* Italian Stuffed Bread (I will further adopt the following recipe and get back to you but in the meantime, if you need it: (http://meredithsfoodforlife.blogspot.com/2009/01/almost-like-grandma-used-to-make-recipe.html))


Salad Course
* Lemon Crab Salad with Avocado and Grapefruit Salad(http://meredithsfoodforlife.blogspot.com/2008/12/lemon-crab-salad-recipe.html)


Dessert
* White Chocolate Peanut Butter and Chocolate Kisses http://meredithsfoodforlife.blogspot.com/2010/01/white-chocolate-peanut-butter-kisses.html
* Peppermint Bark (http://meredithsfoodforlife.blogspot.com/2008/11/barked-up-right-tree-recipe.html)
* White Chocolate Macadamia Cookies (http://meredithsfoodforlife.blogspot.com/2008/12/sweet-and-savory-cookies-recipe.html)
* Raspberry and Grand Marnier Tiramisu http://meredithsfoodforlife.blogspot.com/2009/12/raspberry-and-grand-marnier-tiramisu.html
* Gingerbread House


Wednesday, September 16, 2009

Industrious: Food Musings

I know it's been sometime since my last blog entry and my "disappearance" has been cause for concern (thank you to those sending inquiries as to my whereabouts!)

So, why haven't I been blogging these days? A few reasons: the new school year (getting ready and acclimated to a child in real school), increased load of extracurricular and work activity, and probably the biggest reason I've been absent: watching the weight...

Just because you're on a diet doesn't mean your food has to be void of flavor. In fact, that's just the time to increase the flavor factor! You know, more garlic, more spice, more non-oil laden marinades, etc. One of the great bi-products of committing to a new eating regiment, is the fact that you can really save money. So it's this notion that has inspired me to lose the writers block and share what I know.

Sunday night I made a 7.65 lb. roast chicken. It was on sale for $.99 per pound. So for about $8, I managed to make dinner not one night - but two! And, I made lunch from my $8 purchase not one day - but two! And...I made chicken soup for the Jewish holiday that begins Friday night.

I can't tell you how easy this was and how amazing it feels to make dinner and then continue cooking. Naturally, even if you're not on a diet, you may still want to save money. So here are some ideas you can use for your $8 purchase (or similar amount).

Sunday night - To eat dinner at 6:30 p.m., begin roasting your chicken at 3:00. Wash it well, inside and out, and dry it. Rub Kosher salt inside the cavity and on top of the bird. Sprinkle with ground ginger and pepper. Cut two lemons and 1 onion and stuff them inside, loosely. Then add a bay leaf, fresh dill, and carrots and celery all around the bird. Cook for about 2 1/2 - 3 hours, depending on the directions and weight. See? No oil or other fat...count 3 points for 3 oz of chicken breast! Ours was served with rice and sweet potato and salad.

Pack yourself lunch - Place your alotment of chicken (whatever it might be!) into a take-to-work container and add a salad under it. Or add veggies and rice. Or make a chicken salad with dill and celery or with grapes and walnuts, instead.

Set aside in the fridge remaining meat from the bird (I had about 4-5 cups of chicken).

Soup: Carve the bird and serve - from your Sunday dinner. Place the carcass, all extra bones - with meat stuck to them, a little skin, and all the veggies left over from the roast and additional 1 1/2 cups of chicken into a large soup pot. Add 2 medium onions quartered, more carrots, more chopped celery, more fresh dill, more ground ginger, more salt, a peeled and cut parsnip, a peeled and cut turnip and a couple of whole cloves. Add enough water to just cover the mass. Set on high simmer for about 3-4 hours. Occasionally skim off the cloudy bubbles that form on top. Pour out the broth through a colander and into a large pot - leaving the bones and solids in the colander. Pick off all viable meat and add to the broth with any viable carrots and celery. With the bottom of a cup, squash the remaining veggies, etc. to ensure that all the flavor and juice comes out. Allow broth to cool completely before placing in the fridge, covered. In the morning, skim off the solidified fat. At that point, you can freeze it in small batches for a later date!

Dinner Tuesday night: How about Chicken Burritos? Take out your can of black beans and warm on the stove. Heat a large frying pan sprayed with Pam Spray and saute 2 sliced scallions for two minutes or until soft. Add remaining chicken and heat through. Add about 1 1/2 Tbsp. ground cumin, 2 Tbsp. lemon juice and 1/4 cup chopped cilantro. Mix well. Put into little cups: cheese (use reduced fat if you're watching), beans, avocado cubes, salsa, tomatoes and build a burrito onto a small fat-free tortilla!

Lunch the next day: repeat above!

Tonight...pork chops!

Thursday, August 27, 2009

When a Working Mom Stays Home: Musings on Food and Family


pizza with garlic-soaked fresh tomatoes, fresh basil, fresh sliced mushrooms, air-cured bresoala, sliced artichokes, and kalamata olive halves


Ahh, the debate: should moms work or stay-at-home. I'm not a child psychologist so I have no idea what is better for children and I haven't a clue what the research bears out but I do know that as a working mom I leave each day with a very heavy heart and return with butterflies of excitement just as often. Can there be a right answer? Certainly I think there is a right answer for each person and her family but an overall one-is-better-than-the-other right answer? Not so sure.

Why do I bring this up on my food blog? Well, it's simple. On days I stay home from work, I find myself overcompensating for the fact that we can't do "fun" things all throughout the week. So I try to deliver tons of thrills all at once. By the looks I get, I think it works. When they're old enough to figure out what I'm doing, either they will ignore my wild attempts or I won't be working anymore!

In anticipation of being home today, I promised we would make our own pizza and tonight we kept our promise. I rolled out three pizza pies - one for each child and one for my husband and I to share. I cut up toppings of all sorts and let the kids make their own. They loved making them more than they loved eating them! But it was great fun and now we're all stuffed.

The pizza dough was from Trader Joe's (remember, I am a working parent so I know the value of time management and making dough from scratch for this purpose would have wasted our day together). It was great fun and if you have kids, I encourage this whether or not you work.


Saturday, August 8, 2009

Edible Flowers: Recipe


In the store today I saw a display of beautiful orange flowers. I've seen them before so I knew what they were but my husband was with me and he had never seen them nor did he realize one could actually eat them. So I promptly purchased them (what else would I do?) and sought advice from a book I have that I truly love (The Herb Farm Cookbook by Jerry Traunfeld).

As it states in the book, these blossoms actually taste like the zucchini themselves. They are referred to as squash blossoms and they are wonderful to look at and even more fantastic to eat. The book describes two different types of blossoms - a male and a female version - and goes into how you can tell the difference and how the plant produces so many of them. The thing I found most interesting was the fact that they are only at their peak for one day. So if you come across these it is worth purchasing them but be sure to use them quickly. You can stuff these, fry them, or chop them up and use them in a salad. I decided to deep fry them in a light batter for easy eating - and they were terrific.

Deep Fried Squash Blossoms
6-8 large male squash blossoms
1/2 cup all purpose flour
2 Tbsp. kosher salt
several grindings of pepper
3 cups olive oil

In a deep pot - cast iron is a terrific choice - heat oil over a very high flame until a careful sprinkle of water makes the oil pop and sizzle.

Meanwhile, gently wash the blossoms and dry them on paper towels. Mix together remaining ingredients and drop each blossom into the flour mixture until well coated (shake off any excess flour). Once the oil is hot enough, carefully drop each blossom into the oil and fry about 3-4 minutes. With a large slotted spoon remove the blossoms and drain on brown paper bags. Sprinkle lightly with salt.


Friday, July 24, 2009

Rib Eyes - Easy as Pie: Recipe


How quickly can you fire up your grill? Exactly. So this dinner could not have been any easier - really. It couldn't have been.

Perfectly salted meat tastes incredible when fired up on the barbecue. So all I did here was generously (very generously) salt four rib eye steaks with Kosher salt. I let them sit out at room temperature about 15 minutes before putting them on the grill (about the time it took to get the grill ready). And while the meat was resting, I sliced up some vidalia onion and sauteed it in about one tablespoon of olive oil over medium heat until the onion was browned and soft.

Grill the steaks about 4-6 minutes per side, depending on your temperature preference and then sprinkle them with Stilton Blue Cheese.

AMAZING!


Friday, July 3, 2009

Happy 4th: Food Musings

The 4th of July; a wonderful celebration with family and friends.


(Strawberry Swirl Cake with Vanilla Buttercream, topped with Blueberries and Raspberries)


Wednesday, June 24, 2009

Italian Cooking and Shopping: Resource

Check out: Alta Cucina's new "store." Become a member at http://www.altacucinastore.com and receive 10% discount on your purchases.

Enjoy your food!


Tuesday, May 19, 2009

You did it Again Mom! Recipe


It's the same old scene in our house nearly every night of the week and I'd be willing to bet it's not unlike your house. You know, the rushing to get home, coupled with the "what on earth is there to eat in the house," combined with hungry children who are starved for food and attention. All of that makes for a stressful situation which is why I usually have dinner thought out well before I walk in the door.

However, it can't be that way every night. I can't always know ahead of time what to make and nor can you, I'm sure. There are curve balls and there are changes in plan and all these things need to be appreciated and dealt with with relative ease.

Tonight there was a change in plan due to unforeseen circumstances and I stared into the fridge and wondered what to make when I saw the best thing there is in that kind of scenario: eggs. A frittata, it would be!

It was just me and the kids tonight and my children so lovingly announced that I had done it again! And they proceeded to eat all of their dinner. I discovered the trick to the William-Sonoma special frittata pan - you must spray both pans with non-stick cooking spray! I had never thought of that before.

Prosciutto and Smoked Cheddar Frittata
1/2 cup baby spinach, finely chopped
6 eggs, beaten with a pinch of salt and pepper
3 oz. shredded smoked cheddar
4 oz. cubed prosciutto
1/8 tsp. dried oregano

Beat the eggs in a medium bowl with a pinch of salt and a few grindings of pepper. In the deep side of a large frittata pan, heat several sprays of non-stick cooking spray over medium high heat and saute the prosciutto on high for about 5 minutes, stirring often. When the ham browns, add in the spinach and saute about 1 minute. Add in the eggs and allow them to set over medium heat for about 4 minutes. Sprinkle with the oregano and cover with the shallow side of the frittata pan for about 2 minutes.

With the frittata now covered, using a quick but steady motion, flip the pan. Let it sit over medium high heat for about 2 minutes or until it becomes slightly browned on top. Uncover and sprinkle with cheese and recover for about 1 1/2 minutes or until cheese is totally melted. Uncover and allow the frittata to rest for about 30 seconds before sliding a spatula around the outside of the pan and sliding the frittata onto a plate. Cut into pie-like slices.


Sunday, May 3, 2009

Tinkerbelle('s Sister!): Food Musings


Today we celebrated my daughter's 5th birthday. Really, I can't believe that she is nearly five - seems almost impossible.

She told me she wanted a Tinkerbelle cake and after thinking long and hard, I felt the Tink pan by Wilton would not cut it this time. So I informed my husband that he would need to make "wings" and hot glue them to the torso of a "pick-doll" and we would make Tinkerbelle. After staying up late cutting and gluing and such, my daughter alerts me in the morning to the fact that the doll did not look like Tinkerbelle. I felt bad, but knew that would happen - it wasn't the pixie but a make-believe look-a-like. But she made me feel better a few minutes later when she told me that she realized it was Tinkerbelle's sister! This revelation made us both feel better.

Ultimately, I was pleased with the cake and I think our friends and family felt that way, too. Next time I have to figure out how to get more icing into the middle of the cake! But for now, it was a great first try.

for the recipe to make the yellow cake and buttercream frosting, check here: http://meredithsfoodforlife.blogspot.com/2008/06/gearing-up-for-party-recipe.html

Oh, PS: I used the Wilton Wonder Mold for the cake. You can find it online.


Thursday, April 9, 2009

Thanks Easter Bunny! Menu


Even though I didn't grow up with Easter in my house, I still love it. Throughout high school I worked in a candy store and this was, by far, the busiest holiday of the year and making up the baskets was probably the most fun I've had on a job ever. How could you not be enamoured with heat-sealing? How cool is that? And making bows for the baskets? Still a great skill I have to this day!

Naturally, the food at Easter is always terrific - ham, lamb, turkey, pasta, or brunch fare. Either way, I love it all. Of course. Very little can top Easter Candy and I was always jealous of friends who had fantastic baskets delivered to them by the Easter Bunny. Passover was a lot less exciting at my house - we had Matzoh; others had Peeps. See what I mean?

So now my children have both - Matzoh and Peeps, though not in the same sitting. I am the Bunny and I love leaving a trail of plastic eggs filled with goodies for the kids to find. This Sunday we welcome tons of family for dinner and I am looking forward to a full house.

Easter Dinner Menu

Hors D'Ouevres
* Baked Clam Dip with baguette slices (http://meredithsfoodforlife.blogspot.com/2009/04/baked-clam-dip-recipe.html)
* Spinach Dip in a Bread Bowl
* Assorted Cheeses and crackers

First Course
* Slices of Mozzarella di Bufala with fresh tomato, basil, and Sundried Tomato Pesto (http://meredithsfoodforlife.blogspot.com/2009/04/sundried-tomato-pesto-recipe.html)
* Mother-in-law's Marinated Mushrooms
* Colossal Shrimp Cocktail
* Assorted Marinated Olives
* Homemade Roasted Peppers (http://meredithsfoodforlife.blogspot.com/2009/04/roasted-peppers-recipe.html)
* Provolone Slices
* Sliced Soppressata and Prosciutto
* Grilled, Marinated, Artichoke Hearts
* Crusty Rolls

2nd Course
* Penne Alla Vodka (http://meredithsfoodforlife.blogspot.com/2008/12/sauces-recipe.html)
* Crusty Rolls

Main Course
* Pecan Crusted Racks of Lamb with Rosemary, Mint, and Garlic (http://meredithsfoodforlife.blogspot.com/2009/04/and-main-course-recipe.html)
* Sliced Carrots with Butter, Honey, and Chives (http://meredithsfoodforlife.blogspot.com/2009/04/honey-ginger-carrots-recipe.html)
* Mashed Potatoes (http://meredithsfoodforlife.blogspot.com/2008/09/complete-sunday-meal-recipes.html)
* Bibb Lettuce with Shaved Pecorino and Lemon-Oil Dressing

Dessert
* Easter Cookies (http://meredithsfoodforlife.blogspot.com/2009/04/crazy-cookie-lady-musing.html)
* Devil's Food Cake with Chocolate Buttercream Frosting (http://meredithsfoodforlife.blogspot.com/2009/04/devils-food-cake-with-chocolate.html)
* Cupcakes in baskets (http://meredithsfoodforlife.blogspot.com/2009/04/cupcake-baskets-musing.html)
* Giant Jar of Jelly-Belly Jelly Beans
* Cannoli
* Fruit Platter
* Easter Candy


Sunday, March 15, 2009

Corned Beef from the Not-So-Irish: Recipe


Really, I don't know much about the Irish culture or its food (my particular interest, of course) but when there is another culture's holiday fast approaching and a good cut of beef is on sale marking the occasion, I buy it and investigate later.

I'm Jewish so naturally I've had corned beef before under the "Jewish" hat the beef wears - my mother's slowest-ever cooked holiday brisket could win awards, it's so amazingly delicious and of course I've had many a corned beef sandwich on rye at a Kosher deli with a half-sour pickle, coleslaw, mustard and fries! Clearly I'm familiar with this but to be honest, I've never actually made it in the "Irish" way of slowly simmered in liquid. And I was really eager and curious to try my hand. I poured through recipes to understand the method(s) used and then I added what I thought would work well. My husband said it was terrific (except that the cabbage was slightly bitter - maybe it needed to be cooked a bit longer? Not sure. I'll investigate!).

I admit that even I think this came out rather good. The butcher was kind enough to choose the cut for me so that I indeed got a good piece. Don't be shy in the grocery store - the men and women who work in the produce, butcher, and fish departments are there to help and genuinely appreciate you asking for their expertise. He found a piece for me that was very firm all the way through. So feel the meat (that sounds a bit wrong) carefully to ensure you're getting a good one and look to be sure it has fat on the outside. Remember...Fat is FLAVOR!

Old Fashioned Corned Beef and Cabbage
2 1/2 lb. corned beef of brisket
5 oz. water
11.2 oz. bottle of Guinness
1/4 tsp. cloves
1/4 tsp. mustard seeds
1/4 tsp. caraway seeds
1/4 tsp. whole black peppercorns
5 large carrots, peeled and cut into 1 1/2 inch chunks
1 small head of cabbage, washed and quartered

Rinse the piece of beef and pat dry. Place the beef in a very large pot and cover with all the liquid. Add the cloves, seeds, and peppercorns and bring to a boil. With a spoon, skim off some of the "fatty bubbles" that rise to the surface (my mother calls that schmutz) and reduce heat to medium-low. Cover and simmer for 4 hours. You should turn the meat once an hour and spoon the liquid over the piece as well. After 4 hours, add the carrots, recover and continue to simmer for 1 more hour. With about 40 minutes left, add the cabbage.

Turn off heat after about 5 hours and let the meat sit in the liquid for about 15 minutes before slicing.

NOTE: I did not serve the meat the day this was made. Instead, I left the pot on the stove for about an hour or so to cool and then I covered it and placed it in the refrigerator. I served it two days later by simply warming it on the stove over low heat for about an hour. It was so much better than it was the first night it was made.

Monday, March 9, 2009

Salmon in a Pocket: Recipe


Fish feast, continued...

Salmon is one of those foods that everyone agrees is simple and great for you. It is rich in Omega 3 Fatty Acids and low in fat and cholesterol. It's good "brain" food! So this was really quick to make (I did all the chopping and assembly before taking my suit off!) and the flavors were light, fresh, and super JUICY!

WARNING: Be really careful when opening the pouches - the steam could really burn you.

Salmon in a Pocket
1 1/4 Lb. Organic Salmon Fillet cut into 4 equal pieces
1 lemon, sliced into 8 thin slices
1/4 cup fresh dill, chopped
1 tomato, chopped
8 small fresh shittake mushrooms, sliced
4 Tbsp. Olive Oil, divided
4 one-half teaspoons of capers
12 Kalamata Olives, pitted

Preheat oven to 375.

Cut 4 pieces of aluminum foil into 10" x 10" squares. Place one piece of salmon into the center of each piece. Top with dill then capers followed by mushrooms, tomato pieces and the olives. Drizzle with olive oil and place two slices of lemon on top. Gather the foil at the top and pinch all sides together, creating a little pocket. Place each pocket on a large baking sheet and bake 25 minutes.


Monday, January 12, 2009

The Whole Chicken and Nothing but the Chicken: Recipe


One of the most satisfying things, to me, is the way the house smells while food is being cooked and there is something so comforting about a whole chicken roasting in the oven for hours. The smell just fills each room and seeps into your nose...and you just know that whatever comes out of that oven will be delicious. How can it not be, right?

Yesterday I made a roast chicken that was so juicy and so tender that we all ate and ate and ate until there was very little left over. Of course, I ate a good deal of the skin (and why not? it is the very best part - you can keep the white meat!). It was so crispy and full of flavor...I really enjoyed it.

The bay leaves were a terrific addition under the skin and while the balsamic seemed to caramelize to the point of almost burning, I would still use it again. The juice that came out of the chicken while it rested for that all-important 10 minutes was so wonderful and flavorful that we just dipped the chicken in that instead of making a traditional gravy.

Roast Chicken with Bay Leaves and White Balsamic
6.75 lb. oven stuffer roaster
4 Tbsp. Kosher salt
5 Turkish bay leaves (they're already dried)
2 Tsp. Paprika
Pepper
1/4 cup white balsamic vinegar
1 onion, halved

Preheat oven to 350. Rinse and clean the chicken with running cold water and dry with paper towels, very well. With fingers, gently loosen skin away from the meat by running fingers underneath the skin and tearing the membranes away from the meat. Place all 5 bay leaves under the skin and reshape skin back to original shape. Rub salt all over the bird - inside and out.

Pour vinegar over the bird and then cover the bird with paprika and pepper. Place the halved onion inside the cavity. Roast breast side up until the little pop-up timer pops (for this bird I cooked it 2 hours and 15 minutes and then allowed it to sit for 10 minutes before it was carved).


Wednesday, November 26, 2008

Prettiest Cookies I've Ever Seen: Recipe


I have been waiting weeks to put up this post! My colleague, Mary F., made cookies for Halloween that were so beautiful I begged her to let me take two home for my kids - sorry, Mary, but I ate them and reluctantly shared with my husband. Not only were they spectacular looking but they tasted like they were made in a bakery. They even looked like they came from one as she had them individually wrapped.

She gave the recipe to me and the website that sells this special edible paper. The photos on these cookies are made from rice paper with edible ink. They are terrific -wait till you see the ones I'm making for Christmas! Even prettier than these.

Please check out this company's website for terrific baking supplies. You can find Fancy Flours at http://www.fancyflours.com/vintage-thanksgiving-postcards.html

The recipe for the cookies came from Mary, as well. Here are some tips to make this:

* Purchase the large rectangular cookie cutter from Fancy Flours
* Recipe below makes 6 cookies in the above shape
* Leave plenty of time to make these - they need time to chill in the fridge, bake in the oven, cool on a rack, DRY - icing, that is, and then time to ensure the paper adheres
* Use great care with the paper - it's fragile
* Cut out each picture to the size of the cookie - cut them all out at one time
* Work quickly with icing - it begins to harden easily
* Wrap each cookie individually


Pretty Holiday Cookies
2 1/3 cups all-purpose flour
1 teaspoon salt
1 teaspoon baking powder
1 1/2 sticks unsalted butter
1/2 cup sugar (heaping)
1 egg
1 teaspoon vanilla extract
1 teaspoon orange extract

Preheat the oven to 350.

In a bowl, sift together the flour, salt and baking powder. Set aside.

In another bowl cream the butter and sugar until light and fluffy. Add the egg, vanilla and orange extracts and beat until combined.

Add half the flour mixture, combine well, then add the rest. Beat until the dough just comes together (don’t over mix). Form the dough into a ball, wrap it in plastic, and refrigerate for about 30 minutes.

Once the dough is cold, roll it out to 1/4-inch thick on floured surface. Cut with cookie cutter (if you are making the large rectangle cookies, you can get about 6 from 1 batch).

Place cookies on an ungreased nonstick cookie sheet, at least ½ inch apart. Bake until the cookies are light golden brown, about 12-14 minutes. Let cookies cool completely on a cooling rack before decorating.

Royal Icing
3 tablespoons milk
2 1/2 cups confectioners sugar
In a bowl, mix together until smooth. Use more milk, if needed. Icing should be thin, but not watery.

Once the cookies are cooled, completely, spread one layer of icing onto the tops and allow the icing to completely dry before using the wafer paper. Best to dry overnight in a cool atmosphere.

Wafer Paper instructions -
* cut each picture to the size of the cookie
* spread a thin layer of light corn syrup to the backs of the paper and place onto the cooking/icing.
* Onto waxed paper or parchment, turn all completed cookies - face down - onto the paper for about 45 minutes then turn right-side up and allow the paper to fully dry - at least 8 hours.
* Wrap individually for best presentation